Getting started
This page is the long walkthrough: it installs netviz, builds a three-device inventory one file at a time, validates it, draws it, and then asks it the questions a diagram cannot answer on its own. It ends with the editor setup that makes the next inventory quicker to type than this one.
Everything here is done by hand on purpose. netviz init writes the same tree
in one command and netviz import builds it from what your devices already
report — both are shown below — but the shape of a document is worth typing once.
Contents
- Try it without installing
- Installation
- Faster routes to the same tree
- 1. Make a folder
- 2. Declare a router
- 3. Declare a switch
- 4. Declare a computer
- 5. Connect them
- 6. Check it
- 7. Draw it
- 8. Ask questions about it
- Keep the loop running while you edit
- Editor setup: autocompletion and inline errors
- Where next
Try it without installing
Before spending anything on an install, spend two minutes here:
https://blechschmidt.github.io/netviz/demo/
Every example inventory in the repository is published there as a live diagram.
Those pages are not a demo built to look like netviz — they are the output of
netviz render -f html, the same command step 7 below runs, and
they are rebuilt from main on every push. Each one is a single self-contained
file, so everything in it works with the network unplugged.
What to do when you get there:
- Open home-lab. It is a house: a router, a switch, an access point, three computers, a server and a USB-to-Ethernet adapter.
- Use the layer switcher at the top.
l1is the cabling;l2adds the VLANs to it;l3throws the cabling away and draws the IP subnets instead. The same files, three questions. - Hover or focus a node. The panel that opens is every interface, address, VLAN and cable that element has — the detail a diagram has no room for, which is why netviz keeps the text and the picture as one thing rather than two.
- Open campus and collapse a site, or overlay for VXLAN over IPsec, or patch-room for the rack elevation and the power feeds.
Then come back and build one of your own. It is the same tool: everything on
those pages came out of the eight steps below, run over
examples/.
If you would rather not install Python and Graphviz at all, the container is the other way in — see docker.md.
Installation
netviz needs Python 3.10 or newer.
pip install netviz               # from PyPI
pipx install netviz              # or, to keep it out of your project environments
uv tool install netviz           # same idea, faster
From a checkout — which is what you want if you are changing netviz itself —
use uv. uv.lock is committed, so this builds the
same environment every CI job builds, down to the patch version:
uv sync                          # runtime dependencies, from uv.lock
uv sync --extra dev              # including the development tooling
uv run netviz --version          # or activate .venv and drop the prefix
Graphviz is a system prerequisite
The svg, png, pdf and html formats are produced by running the Graphviz
dot binary, which is a system package rather than a Python one — so pip alone
is not enough:
sudo apt install graphviz        # Debian / Ubuntu
sudo dnf install graphviz        # Fedora / RHEL
brew install graphviz            # macOS
choco install graphviz           # Windows
Check it with dot -V. The dot, mermaid and json formats are written by
netviz itself and work without it — so if you only need DOT output to feed
into another tool, you can skip the install.
On Windows and macOS
netviz is tested on windows-latest and macos-14 as well as Linux; see
testing.md for what each job covers. Everything on this page works
unchanged on all three. Four notes are worth having up front.
Graphviz is often installed without being on PATH. This is the normal
outcome of the Windows installer and of choco install graphviz, and it also
happens on macOS whenever a process was started without /opt/homebrew/bin in
its environment — a GUI-launched editor, most often. netviz therefore looks in
the documented install locations too, so netviz render -f svg usually works
anyway. When it does not, name the binary outright rather than fighting PATH:
# Windows, PowerShell
$env:NETVIZ_DOT = 'C:\Program Files\Graphviz\bin\dot.exe'
# macOS
export NETVIZ_DOT=/opt/homebrew/bin/dot
If Graphviz cannot be found at all, netviz says so and says how to install it
for your platform — it does not raise a FileNotFoundError.
Shell completion is a PowerShell script, and it is evaluated rather than
sourced. One line, and the same line goes in $PROFILE:
netviz completion powershell | Out-String | Invoke-Expression
See completion.md. bash, zsh and fish are also
generated, which covers Git Bash and WSL on Windows and the default shell on
macOS.
Line endings. Everything netviz writes — a formatted document, a rendered
diagram, an exported artefact, a generated schema — uses \n on every platform,
because the canonical form netviz fmt enforces is defined in bytes. If you
keep an inventory in Git on Windows, add a .gitattributes next to it so Git
does not translate them back:
*.yaml text eol=lf
*.yml  text eol=lf
Without it, git config core.autocrlf true (the Windows default) hands netviz
CRLF files, netviz fmt rewrites them to LF, and Git reports every file as
modified — a loop that is confusing and entirely avoidable. This repository has
such a file for the same reason.
netviz watch waits a little longer before re-rendering. 700 ms of quiet
on Windows and macOS against 300 ms on Linux, because the filesystem-event
backends there deliver one save as events spread over a wider span; a shorter
window would re-render twice per keystroke. --debounce MS overrides it.
Faster routes to the same tree
In a hurry? netviz init writes exactly the tree this page
builds — including the editor wiring — and it validates and renders straight
away:
netviz init my-network && cd my-network
netviz validate
netviz render -f svg -o network.svg
Already have a network? netviz import builds the tree from
output you collect on the devices themselves — LLDP neighbours, ip -j addr show, or the cabling list you already keep — so the first inventory is a diff
away from correct rather than a weekend of typing:
lldpctl -f json > collected/"$(hostname -s)".lldp.json    # on each device
netviz import -o my-network collected/*.json
The rest of this page builds the same thing by hand, which is the part worth reading once.
1. Make a folder
mkdir -p my-network/devices my-network/cables && cd my-network
The layout is up to you: netviz loads every *.yaml and *.yml under the
root, at any depth. Directories become namespaces, so devices/rtr-gw is the
full name of the router below, and names only have to be unique within their
own folder. docs/inventory-layout.md covers the loading
rules, .netvizignore and the layouts that scale past one site.
2. Declare a router
devices/rtr-gw.yaml:
apiVersion: netviz.dev/v1alpha1
kind: router
metadata:
  name: rtr-gw
  labels: {site: office}
  annotations:
    # wan0 faces the ISP, which is not an element of this inventory, so it
    # terminates no cable on purpose.
    netviz/ignore: NV-C015
spec:
  vendor: MikroTik
  interfaces:
    - name: wan0
      type: ethernet
      description: ISP hand-off
      mtu: 1500
      ipv4:
        addresses: [203.0.113.2/30]
    - name: lan0
      type: ethernet
      description: Downlink to the switch
      mac: '00:1e:8c:aa:00:01'
      mtu: 1500
      ipv4:
        addresses: [192.168.10.1/24]
      vlan:
        mode: access
        access_vlan: 10
  vlans:
    - id: 10
      name: office
Every document has the same four keys: apiVersion, kind, metadata and
spec. 203.0.113.2/30 is shorthand — write
{ip: 203.0.113.2, prefix_length: 30} instead if you prefer it explicit, or
netmask: 255.255.255.252 if that is how your notes are written. All three
normalise to the same value.
The netviz/ignore annotation is the one line here that is about the
validator rather than about the network. wan0 faces an ISP that this
inventory does not model, so it terminates no cable, and netviz would otherwise
mention it as I002 (NV-C015, "enabled but terminates no cable"). Annotating
the one element that has a reason is what an exception should look like; turning
the rule off for the whole tree would not be. See
docs/validation.md.
3. Declare a switch
devices/sw-office.yaml:
apiVersion: netviz.dev/v1alpha1
kind: switch
metadata:
  name: sw-office
  labels: {site: office}
spec:
  interfaces:
    - name: port1
      type: ethernet
      description: Uplink to rtr-gw
      mtu: 1500
      vlan: {mode: access, access_vlan: 10}
    - name: port2
      type: ethernet
      description: Desk
      mtu: 1500
      vlan: {mode: access, access_vlan: 10}
  vlans:
    - id: 10
      name: office
The switch has no IP address at all, which is the point: it is a layer-2
bridge, and its ports carry VLAN membership rather than addressing. (A
management address would go on a type: vlan SVI — putting one on a bridge
port is warning W104.)
4. Declare a computer
devices/pc-alice.yaml:
apiVersion: netviz.dev/v1alpha1
kind: computer
metadata:
  name: pc-alice
  labels: {site: office}
spec:
  interfaces:
    - name: eno1
      type: ethernet
      mac: '00:1e:8c:bb:00:01'
      mtu: 1500
      ipv4:
        addresses: [192.168.10.20/24]
Note what is absent: no vlan block. The host sends untagged frames and
inherits the VLAN of the access port facing it. That is the expected pairing,
and netviz knows not to complain about it.
5. Connect them
cables/links.yaml — one file, two documents, separated by ---:
apiVersion: netviz.dev/v1alpha1
kind: cable
metadata: {name: cbl-rtr-sw}
spec:
  endpoints: [rtr-gw:lan0, sw-office:port1]
  medium: copper
  speed: 1Gbps
---
apiVersion: netviz.dev/v1alpha1
kind: cable
metadata: {name: cbl-sw-alice}
spec:
  endpoints: [sw-office:port2, pc-alice:eno1]
  medium: copper
  speed: 1Gbps
A cable is its own element, not a field on a device. It joins exactly two
interfaces, written as device:interface, and the order carries no meaning.
Each cabled interface states mtu: 1500, so the two ends of every link agree
and warning W102 stays quiet.
6. Check it
$ netviz validate
no problems found
Try breaking something — rename port2 to port9 in the cable — and you get
the file, the document index, the line, the rule id and a message that lists
the interfaces the switch actually has:
$ netviz validate
errors (1):
  cables/links.yaml#1:9  E001  cable 'cables/cbl-sw-alice' endpoint sw-office:port9: 'devices/sw-office' has no interface 'port9'; it declares 'port1', 'port2'

infos (1):
  devices/sw-office.yaml#0:1  I002  interface 'devices/sw-office:port2' is enabled but terminates no cable; mark it 'enabled: false' if the port is spare

1 error, 1 info
links.yaml#1:9 is the file, the second document in it (0-based) and line 9.
The I002 below the error is the same mistake seen from the other side: with the
cable pointing at a port that does not exist, port2 now terminates nothing.
7. Draw it
netviz render -f svg -o topology.svg
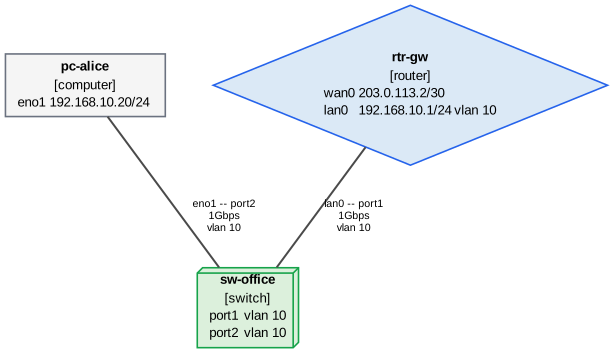
That picture is docs/images/quickstart.svg, rendered
from this very inventory. Without -o the diagram goes to standard output,
which is how you check the shape of a small tree without leaving a file behind —
Mermaid is the most readable of the text formats:
$ netviz render -f mermaid
flowchart TB
    n0[/"pc-alice<br/>[computer]<br/>192.168.10.20/24<br/>vlans: 10"/]
    n1(["rtr-gw<br/>[router]<br/>203.0.113.2/30<br/>192.168.10.1/24<br/>vlans: 10"])
    n2["sw-office<br/>[switch]<br/>vlans: 10"]

    n1 -- "lan0 ↔ port1 · 1Gbps" --- n2
    n0 -- "eno1 ↔ port2 · 1Gbps" --- n2

    classDef computer fill:#f5f5f5,stroke:#6b7280,stroke-width:1px
    classDef router fill:#dbe9f6,stroke:#2563eb,stroke-width:1px
    classDef switch fill:#dcf0dc,stroke:#16a34a,stroke-width:1px
    class n0 computer
    class n1 router
    class n2 switch
rendered 3 node(s) and 2 edge(s) as mermaid at layer l1
Validation always runs first, so a render either reflects a tree that holds
together or refuses. Layers, filtering, icons and the interactive HTML page are
in docs/rendering.md.
8. Ask questions about it
The inventory is now a queryable model rather than a picture. netviz list
summarises one kind of thing at a time:
$ netviz list devices
NAME               KIND      PORTS  ADDRESS           VLANS
-----------------  --------  -----  ----------------  -----
devices/pc-alice   computer      1  192.168.10.20/24  10
devices/rtr-gw     router        2  203.0.113.2/30    10
devices/sw-office  switch        2  -                 10
$ netviz list subnets
SUBNET           IP  ADDRESSES  ELEMENTS  VLANS
---------------  --  ---------  --------  -----
192.168.10.0/24   4          2         2  10
203.0.113.0/30    4          1         1  -
Note that nothing in the YAML above declared a subnet: both prefixes were
derived from the addresses on the interfaces. cables, vlans and tunnels are
the other things netviz list will summarise.
And the question the diagram cannot answer on its own:
$ netviz path pc-alice rtr-gw
devices/pc-alice -> devices/rtr-gw: 1 path
  source       devices/pc-alice  [computer]
  destination  devices/rtr-gw  [router]
  layer        2, switched
  vlan         10 (assumed by the trace)

path 1 of 1 · 2 hops · vlan 10
   1  devices/pc-alice  [computer]
      out eno1                  192.168.10.20/24
      ->  cable cbl-sw-alice  (copper, 1Gbps)  vlan 10
   2  devices/sw-office  [switch]
      in  port2
      out port1
      ->  cable cbl-rtr-sw  (copper, 1Gbps)  vlan 10
   3  devices/rtr-gw  [router]
      in  lan0                  192.168.10.1/24
Nothing was pinged: this is a trace over the topology you declared, which is
exactly the thing to compare against what the network does. See
docs/paths.md.
netviz ipam grades the address plan rather than listing it — how full each
prefix is, and whether anything overlaps or contradicts:
$ netviz ipam
PREFIX           IP  VLANS  HOSTS  USED  FREE   UTIL  DEVICES
---------------  --  -----  -----  ----  ----  -----  -------
192.168.10.0/24   4  10       254     2   252   0.8%        2
203.0.113.0/30    4  -          2     1     1  50.0%        1

conflicts
no problems found
The /30 reads as half empty because only the router's end of the ISP hand-off
is an element here. docs/ipam.md explains the sizing rules and the
conflict checks.
Finally, when you want to know what netviz made of a document — every default it filled in, every shorthand it expanded — ask it to print the element back:
$ netviz show devices/pc-alice
apiVersion: netviz.dev/v1alpha1
kind: computer
metadata:
  name: pc-alice
  labels:
    site: office
  annotations: {}
spec:
  interfaces:
  - name: eno1
    type: ethernet
    enabled: true
    mac: 00:1e:8c:bb:00:01
    mtu: 1500
    ipv4:
      enabled: true
      forwarding: false
      mtu: 1500
      addresses:
      - ip: 192.168.10.20
        prefix_length: 24
  vlans: []
  forwarding:
    ipv4: false
    ipv6: false
  netns: []
  vrfs: []
  route_tables: []
  routes: []
  routing_policy: []
  zones: []
192.168.10.20/24 came back as {ip: ..., prefix_length: 24}, and
enabled: true was never typed. This is the fastest way to settle an argument
about what a document means — see netviz show.
That is the whole loop: write YAML, validate, render. Everything else is detail.
Keep the loop running while you edit
While you are still typing, let netviz run the loop for you:
netviz watch --serve
Every save re-validates and re-renders, and the page at
http://127.0.0.1:8080/ updates itself. See
netviz watch.
The finished inventory is checked in as
examples/quickstart, and the test suite validates and
renders it on every run — so if you got a different answer than this page
promised, that is a bug in netviz rather than in your typing.
Editor setup: autocompletion and inline errors
Inventories are written by hand, so the editor is the first place a mistake can be caught. There are two ways to wire it up, and they compose.
The language server is the better one. netviz lsp is a Language Server
Protocol server over stdio, and it answers about the whole folder: the
diagnostics are the ones netviz validate prints, the completion for a cable
endpoint offers the switches you actually have and then the ports they actually
have, hover resolves a reference, and rename rewrites every mention of an
element across every file. docs/lsp.md has the configuration for
VS Code, Neovim, Helix and Emacs, and editors/ has a minimal
VS Code client.
The JSON Schema is the other, and it needs no netviz process at all.
netviz schema emits a
JSON Schema 2020-12
document generated from the pydantic models; the yaml-language-server behind
VS Code, Neovim and the JetBrains IDEs turns it into completion, hover
documentation and squiggles under bad values.
$ netviz schema --kind cable
{
  "$schema": "https://json-schema.org/draft/2020-12/schema",
  "$id": "https://netviz.dev/schema/v1alpha1/cable.json",
  "title": "netviz cable document",
...
A generated copy is committed at
schema/netviz.schema.json, so you can use
it without installing netviz first — and netviz init
writes one into a new inventory with the modeline below already on every
document, which is the setup-free path.
Per file, no configuration. The language server reads a modeline on the first line:
# yaml-language-server: $schema=https://raw.githubusercontent.com/netviz/netviz/main/schema/netviz.schema.json
apiVersion: netviz.dev/v1alpha1
kind: switch
metadata:
  name: sw-office
A relative path ($schema=../../schema/netviz.schema.json) works too and
keeps the tree usable offline.
Whole tree, in VS Code. Install the
YAML extension
and add one glob to .vscode/settings.json:
{
  "yaml.schemas": {
    "./schema/netviz.schema.json": ["inventory/**/*.yaml"]
  }
}
Neovim's yamlls and the JetBrains IDEs take the same mapping. Regenerate the
committed copy with python tools/gen_json_schema.py; tests/test_schema.py
fails when it drifts from the models.
The schema is versioned alongside apiVersion — its $id is
https://netviz.dev/schema/v1alpha1/element.json, and a future v1beta1 gets
its own rather than replacing it.
It does not replace netviz validate. The schema sees one document at a
time, so it checks structure, value grammars and rules within a single object.
Whether a cable endpoint names an element that exists, whether names are unique,
whether two ends of a link agree on a VLAN — all of that needs the whole tree,
and it is exactly what netviz lsp adds on top. Keep running
netviz validate in CI either way.
docs/schema.md §13 has the full comparison
and the per-kind setup, and netviz schema has the
command's own options.
Where next
docs/inventory-layout.md— how a tree is discovered and loaded, namespaces, and the layouts that survive a second site.docs/validation.md— the rule catalogue, severities,--strict, and how to record a deliberate exception.docs/rendering.md— layers, filters, collapsing, icons and the interactive HTML output.docs/paths.mdanddocs/ipam.md— the two analyses that read the model rather than draw it.docs/importing.md— build the first inventory from LLDP,ip -j addr showor a spreadsheet instead of from scratch.docs/configuration.md—netviz.toml, per-inventory render defaults and named profiles.docs/ci.md— validating the inventory and publishing the diagram on every push.docs/schema.md— the full specification, when a field's exact grammar matters.
See also
netviz init— the scaffolded version of this page.docs/inventory-layout.md— the next thing to read.docs/schema-reference.md— every field of every kind, generated from the models.