The web dashboard
The dashboard does in a browser what cloop does in a terminal: create a project, edit its goal, add and reorder tasks, toggle run options, start and stop a run, and watch the output live. This page covers one person on one machine. For a team, see the last section.
- Starting it
- What it authenticates by default
- The layout
- Projects
- A project's Overview
- Tasks
- Run options
- Settings
- Live updates
- Beyond one user on one machine
Starting it
cloop ui                                    # port 8080, opens your browser
cloop ui --port 9090 --no-browser
cloop ui --scan ~/Projects                  # find every cloop project under a directory
cloop ui --projects /srv/app --projects /srv/api
| Flag | Default | Meaning |
|---|---|---|
--port |
8080 |
Port to listen on |
--listen |
see below | Address to listen on, without the port; overrides ui.listen |
--no-browser |
false |
Do not open a browser window at startup |
--projects |
— | Additional project directories, repeatable |
--scan |
— | Scan a directory for cloop projects and add them |
--token |
— | Deprecated static bearer token; also read from CLOOP_UI_TOKEN |
--rate-limit |
20 |
Requests per second per IP (0 uses the default) |
--rate-burst |
50 |
Burst size per IP (0 uses the default) |
--tls-cert / --tls-key |
— | Serve HTTPS directly; overrides ui.tls in the config |
Projects added with --projects or --scan are saved in your registry at
~/.cloop/projects.json, so they are listed next time without the flags.
CLOOP_HOME moves the registry, which helps when two hubs share a Unix
account. TLS, WebSocket connection limits and allowed origins are set under
ui.* in .cloop/config.yaml. That file holds the security settings, so a YAML
error in it is fatal, not a warning. See
the configuration reference.
Without sign-in configured, cloop ui listens on 127.0.0.1 only, and says so:
cloop dashboard running at http://127.0.0.1:8080, listening on 127.0.0.1:8080
No sign-in is configured, so the dashboard listens on 127.0.0.1:8080 only. To reach it from another machine, configure SSO (ui.oidc) or a token (CLOOP_UI_TOKEN) — the hub then listens on every interface — or tunnel: ssh -L 8080:127.0.0.1:8080 <this-host>.
With sign-in, it listens on every interface. --listen (or ui.listen) sets
the address: 127.0.0.1, 0.0.0.0, :: or one interface's address. Without
sign-in, an address beyond loopback is refused unless
ui.allow_unauthenticated_network: true is set.
The configuration reference
has the full rule and the error message.
What it authenticates by default
Nothing, by default. With no --token and no OIDC configured, every route is
served without authentication, including those that start a run, edit a plan or
delete a project. That is why such a hub stays on loopback: anyone who could
reach it over the network could run code on your machine. Every local user and
process can still use it, though.
To make it reachable from other machines, first set up sign-in:
- OIDC single sign-on (
ui.oidc.*) for people, with claim-based RBAC once you write a role policy. Without a policy, everyone who can sign in has full access, and the hub warns about this at every start. With SSO on, the hub listens on every interface. - Scoped API tokens (
cloop hub token create) for scripts and CI. A token carries roles, can be limited to specific projects, expires, and can be revoked on its own. Tokens restrict the callers that present one, but requests without a token are still served, so tokens alone don't make a hub safe on a network. They also don't change where it listens.
--token (or CLOOP_UI_TOKEN) also counts as sign-in, but it is deprecated
and prints a warning at startup: it bypasses RBAC, sees every project, and
can't be revoked for one caller without breaking it for all the others.
The security model covers SSO and scoped tokens. Remote
executor agents connect to the hub, so a hub that serves them over the network
needs SSO or a token.
The layout
The tab bar has two labelled groups. The Project tabs show one project at a time: Overview, Tasks, Requirements, Knowledge, Activity, Kanban, Timeline, Knowledge Base, Dependencies, Risk Matrix, Analytics, Chat, Assistant, Replay and Provider Calls. The Global tabs apply to the whole hub: Projects, Budget, Executors, Secrets, Audit, Quotas, Telemetry and Settings. Secrets, Audit, Quotas and Telemetry are hidden unless your role has the matching permission, so a single-user install usually shows Projects, Budget, Executors and Settings.
This page has one section per screen. For a step-by-step setup (where work may run, then a project, then its tasks), see the dashboard walkthrough, which uses the same screenshots.
Projects
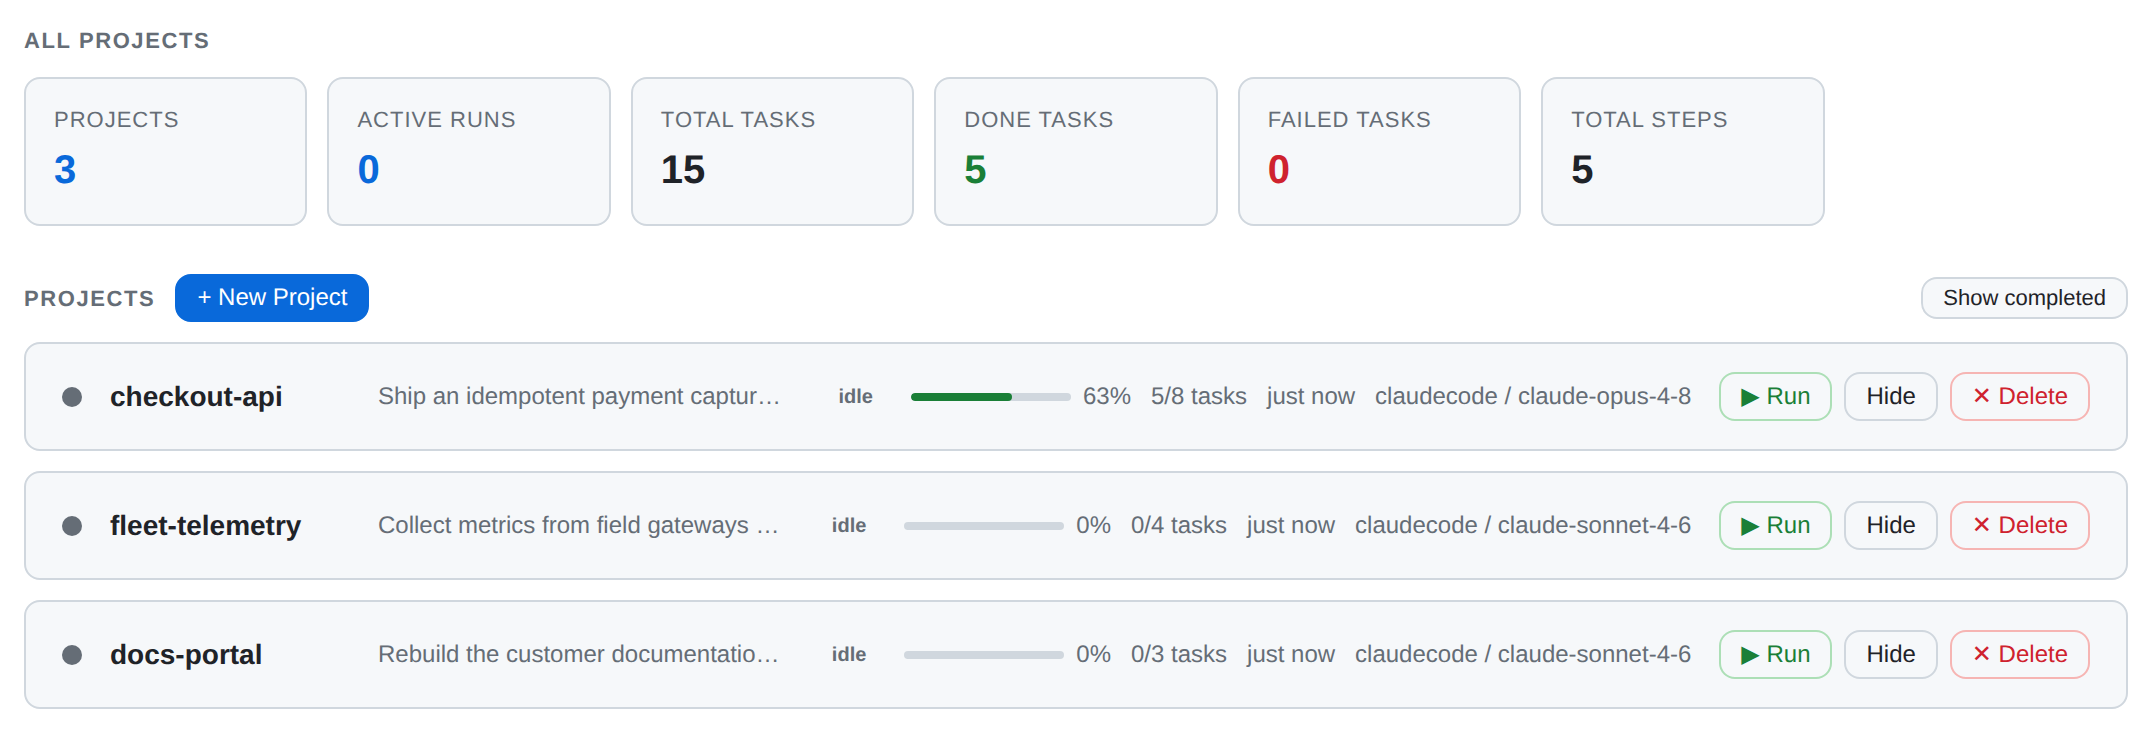
The Projects tab shows counters for projects, active runs, total, done and
failed tasks, and total steps, then one row per project. Each row has the goal,
a live status pill, a progress bar, done/total tasks, when the project was
last active, and its provider and model. Click a row to open the project.
Adding one. + New Project asks for a directory and a goal, with optional Provider, Model and Effort pickers and a Start run immediately checkbox. The collapsed Access (optional) section can also pick the executor the project runs on and attach credential grants. If the executor or any grant is refused, the whole creation is rolled back, so nothing is left half set up. In a directory that isn't a cloop project yet, the Overview tab shows an Initialize a project panel that does the same for the working directory.
Running one. Each row has a Run button, and Stop while a run is going, so you can manage several projects from the list.
Hiding and deleting. Hide removes a project from your dashboard only. It keeps running, other users still see it, and Settings → Hidden Projects brings it back. Delete asks for confirmation, and has a checkbox to delete the project directory from disk as well.
A project's Overview
The Overview tab is the control panel for one project. Its cards, from top to bottom:
| Card | Contents |
|---|---|
| Project Goal | the goal, the status badge, and an Edit button |
| Instructions / Constraints | the extra instructions the AI is given, also editable |
| Overview | Steps, Provider, Executor, Mode, Tokens, Est. Cost, Created, Updated |
| Active Options | the persistent run flags (see Run options) |
| Features | the project's parallel features, each a git worktree with its own tasks and settings, and a + New feature button (see developing features in parallel) |
| Claude Code Subscription Caps | weekly, 5-hour, Opus and Sonnet utilisation limits, plus the weekly usage of any model your plan limits separately, such as Fable. Shown only with the claudecode provider |
| Controls | Run, Pause / Stop while running, Refresh, Voice |
| Live Output | the running step's output as it arrives, with Clear |
| Event History | steps together with task starts, completions, failures, skips, heals, evolve cycles and status changes, newest first. New rows appear as they are written, and older ones load as you scroll |
Two of the stat cards are also buttons. Provider opens a Provider & Model
picker. The choice is saved on the project and used by every later run until
you change it. Its Effort selector applies to claudecode only, and says so.
Executor chooses where this project's harness runs, from the next run on.
Work already running stays where it started.
A feature's Overview is the same page, under a banner that names its project and branch and offers Open pull request and Remove feature. A feature uses its project's executor, repository access and credentials, so you change those on the project.
Tasks
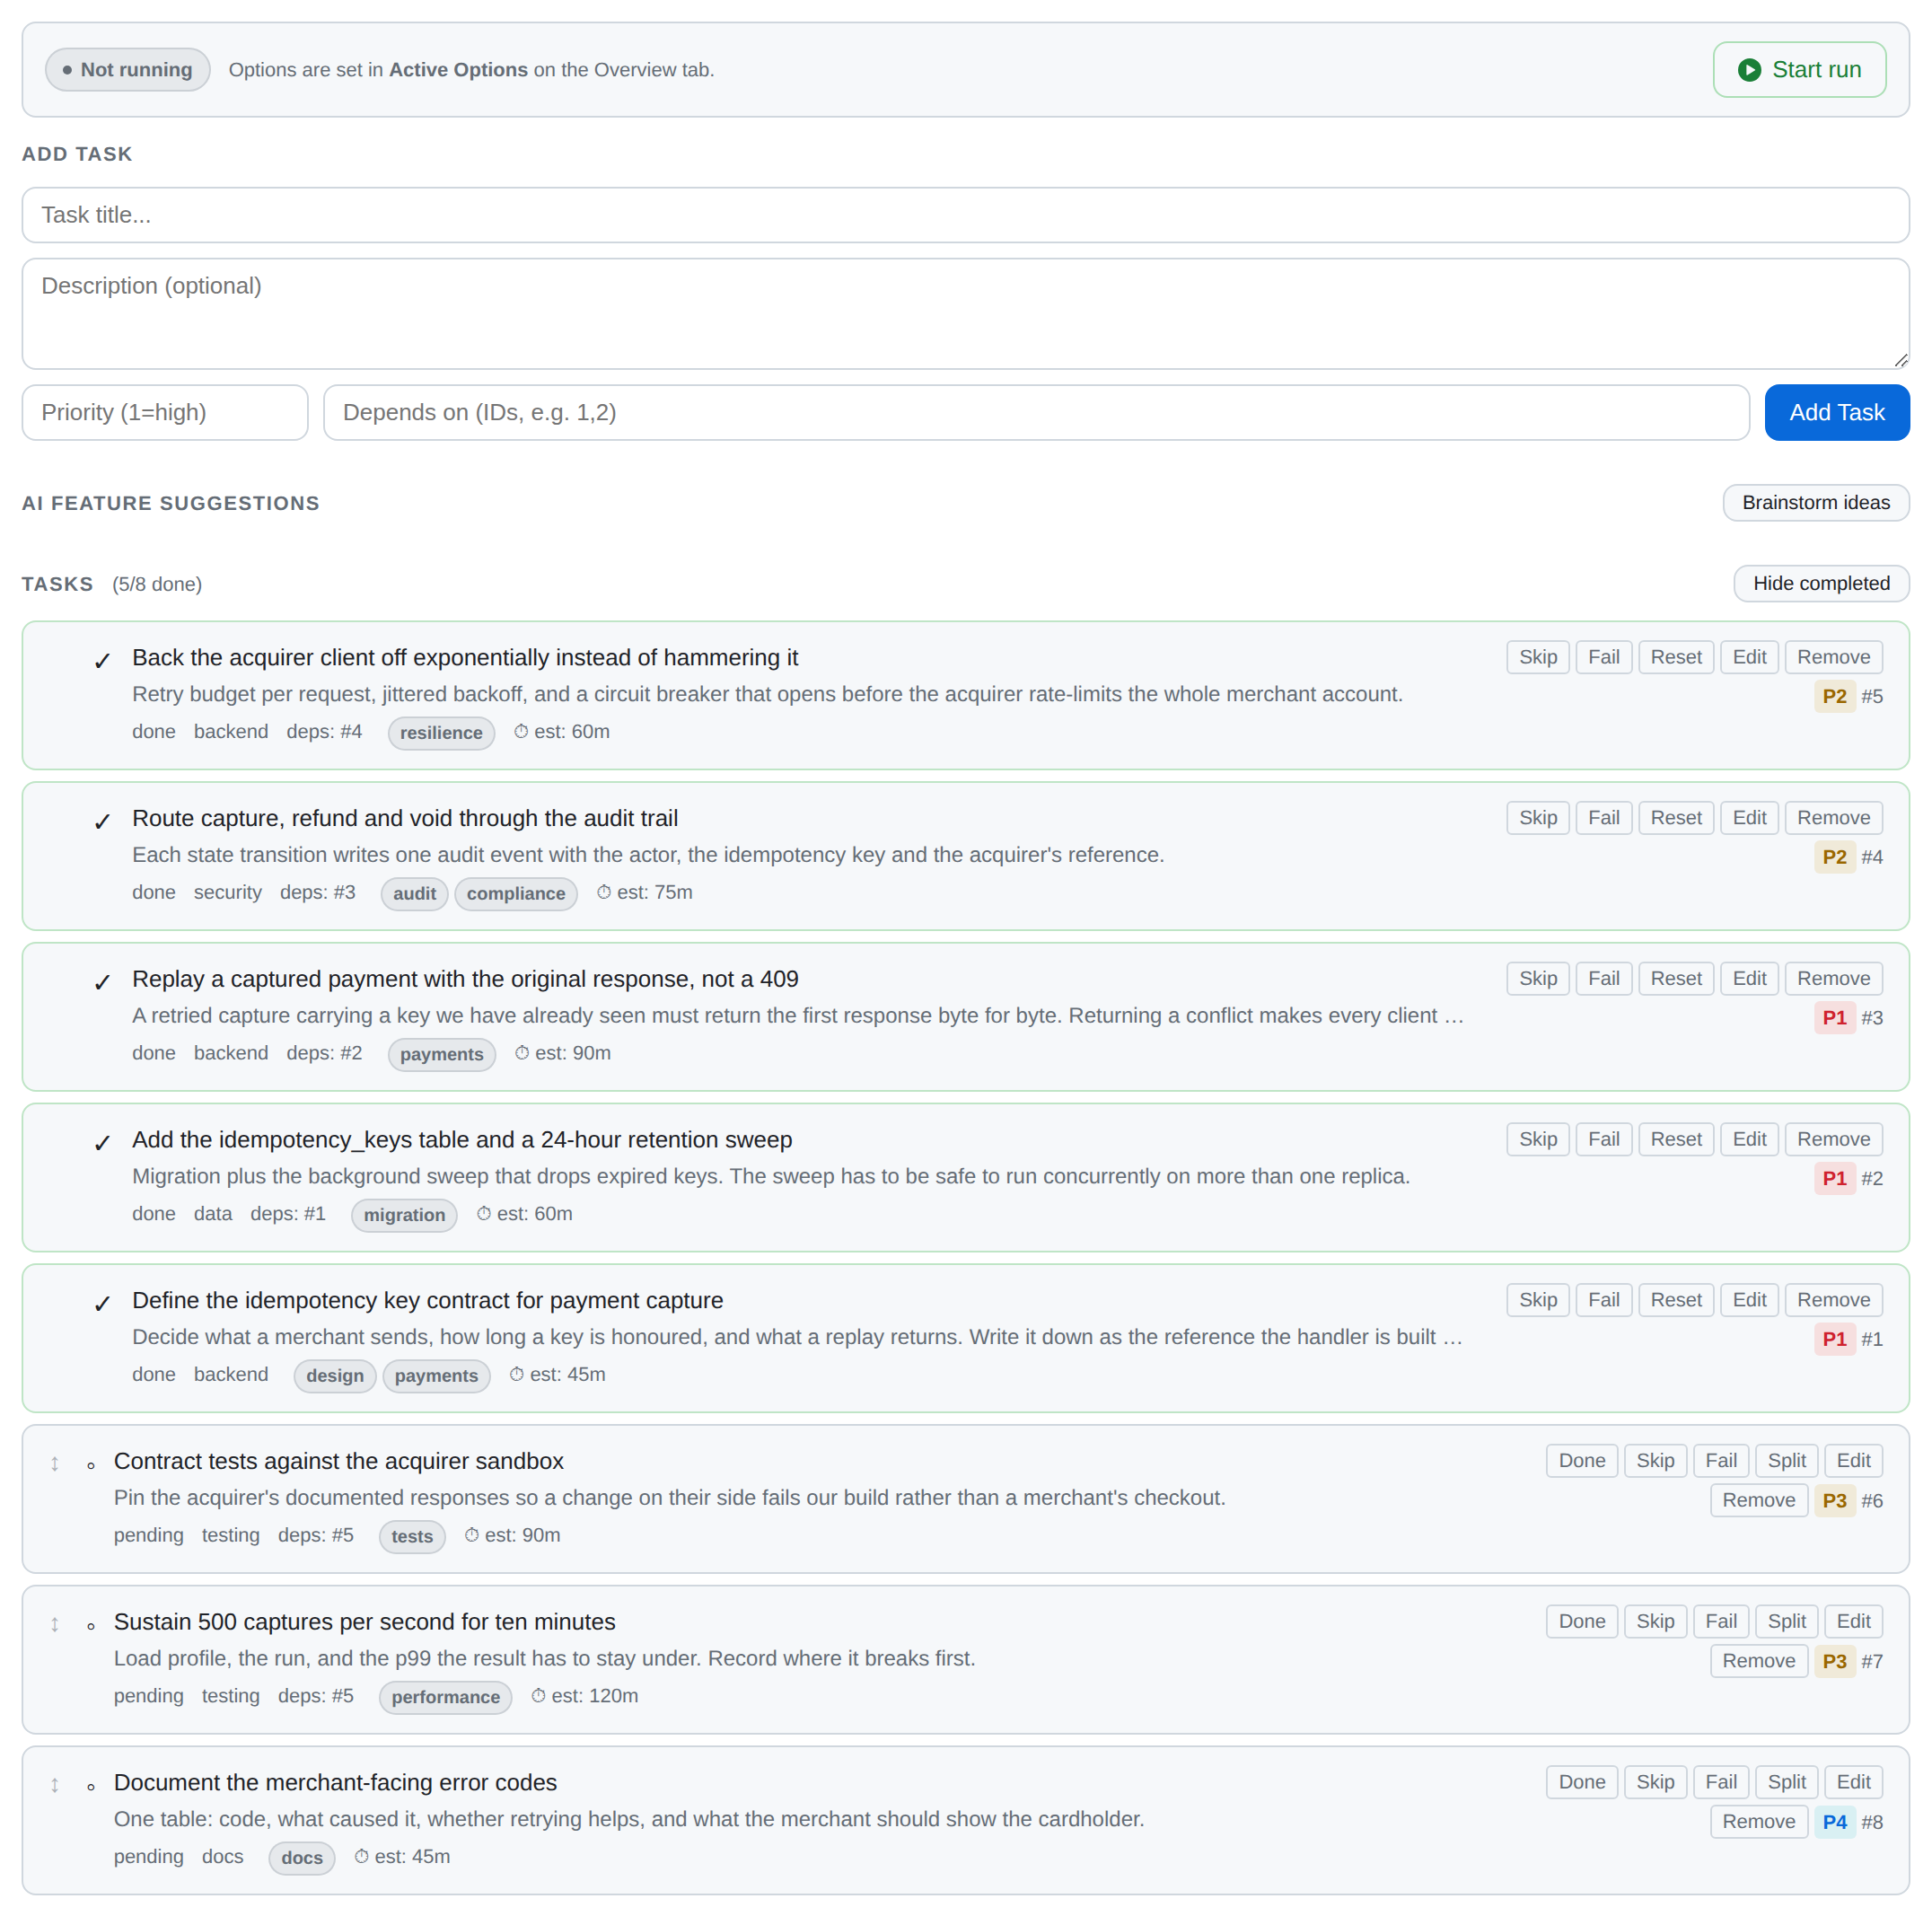
You can filter the list by free text, status, priority, assignee and tags. Completed tasks stay hidden until you turn on Show completed. The header counts done and hidden tasks.
Adding uses the inline form at the top: a title, an optional description, a
priority (1 is highest) and a comma-separated list of task IDs to depend on.
Add Task adds it straight away. The description box takes as many lines as
you need: Enter starts a new line there, and Ctrl+Enter (⌘+Enter on a Mac) adds
the task, as Enter does in the title.
Decompose, next to Add Task, is for a task too big to give an agent in one go. It asks the AI to break what you typed into a plan of several tasks, and adds nothing until you say so. The AI Feature Suggestions panel below opens with your title and description as the request, and the plan appears there as numbered steps, to add one at a time or with Add all. Every task in the plan gets the priority you typed, and waits for the tasks under Depends on as well as for the plan's earlier steps. The panel notes this above the steps. With no priority, the plan joins the end of the queue in order, like any other tasks. The form clears once the hub has started planning. If the hub refuses (one plan or brainstorm runs per project at a time), the form keeps what you typed.
AI Feature Suggestions, below the form, proposes tasks for you to review.
With its text box empty, Generate brainstorms ideas from the project goal,
and the number next to it sets how many (five if blank). If you describe what
you want, such as "add OAuth login with GitHub", the request is broken into
the tasks of a plan instead. The number is then labelled Tasks in plan, and
if left blank the plan has as many tasks as the request needs. A plan's cards
are numbered steps that say which steps they come after. Add as task,
Skip and Add all work the same for ideas and plans. A plan's tasks join
the end of the queue in plan order and keep their dependencies on each other,
in whatever order you add them. A skipped step's dependencies pass on to the
steps that come after it. On the command line, use
cloop suggest --input. Both kinds
run on the project's executor, like its runs.
Editing opens a dialog with the title, description, priority, dependencies
and a per-task Max minutes budget (0 uses the project default). The row
buttons set the status directly, and each row shows the ones that fit its
status: Done, Skip, Fail, Split, Edit and Remove on a
pending task, with Reset in place of Done and Split once it has finished.
Remove asks for confirmation. Split is Decompose for a task already in
the list: it proposes sub-tasks to keep or drop, then adds the ones you kept in
sequence and marks the original task skipped.
Reordering is drag and drop, and the list is the run queue: tasks run from top to bottom, and dragging a row changes the priorities the scheduler reads. This works during a run too. The orchestrator rereads the order each time it picks a task, so a task you drag to the top starts next, with no restart. Three rules apply:
- Dependencies still apply. A task dragged to the top still waits for the tasks it depends on. The order only decides between tasks that are ready.
- Only pending tasks can be moved. Completed and running tasks have no drag handle, because they have left the queue.
- Pinned tasks stay first.
cloop task pinkeeps a task at the head of the queue, so a drag across that boundary is refused and nothing changes. Runcloop task unpin <id>first.
With max-parallel above 1, the same order decides which tasks start: the top N in the queue, where N is the number of workers.
Attachments are files a run made for you, such as a report, a chart, a screenshot or a log. A task with attachments shows a 📎 count. Open the task to see them, with Preview for images and text, Download for any file, and Delete. An agent attaches a file by copying it into the outbox folder its prompt names. See Task attachments.
Other tabs show the same plan differently: Kanban as four columns (Pending, In Progress, Done, Failed/Skipped) of draggable cards, Timeline as a Gantt chart, Dependencies as a graph, and Activity as a per-task log of every execution, heal retry and evolve cycle.
Run options
The Run button has no options dialog. Each persistent flag is a badge in the Active Options card on Overview, and clicking a badge toggles it:
| Badge | Flag |
|---|---|
| Evolve Mode | --auto-evolve |
| Innovate Mode | --innovate |
| Skip Clarify | --skip-clarify |
| Parallel | --parallel |
| Plan Only | --plan-only |
| Retry Failed | --retry-failed |
| Dry Run | --dry-run |
The card also has three number fields: Max Parallel (-j, 1–64, the
worker limit when Parallel is on), Step Timeout (a duration, or off) and
Task Timeout (minutes, 0 for none). A new Task Timeout applies to tasks
already running within a few seconds, as well as to later ones.
These settings are stored on the project, so the dashboard and the CLI share
them: a badge you turn on here is a flag cloop run uses too.
Settings
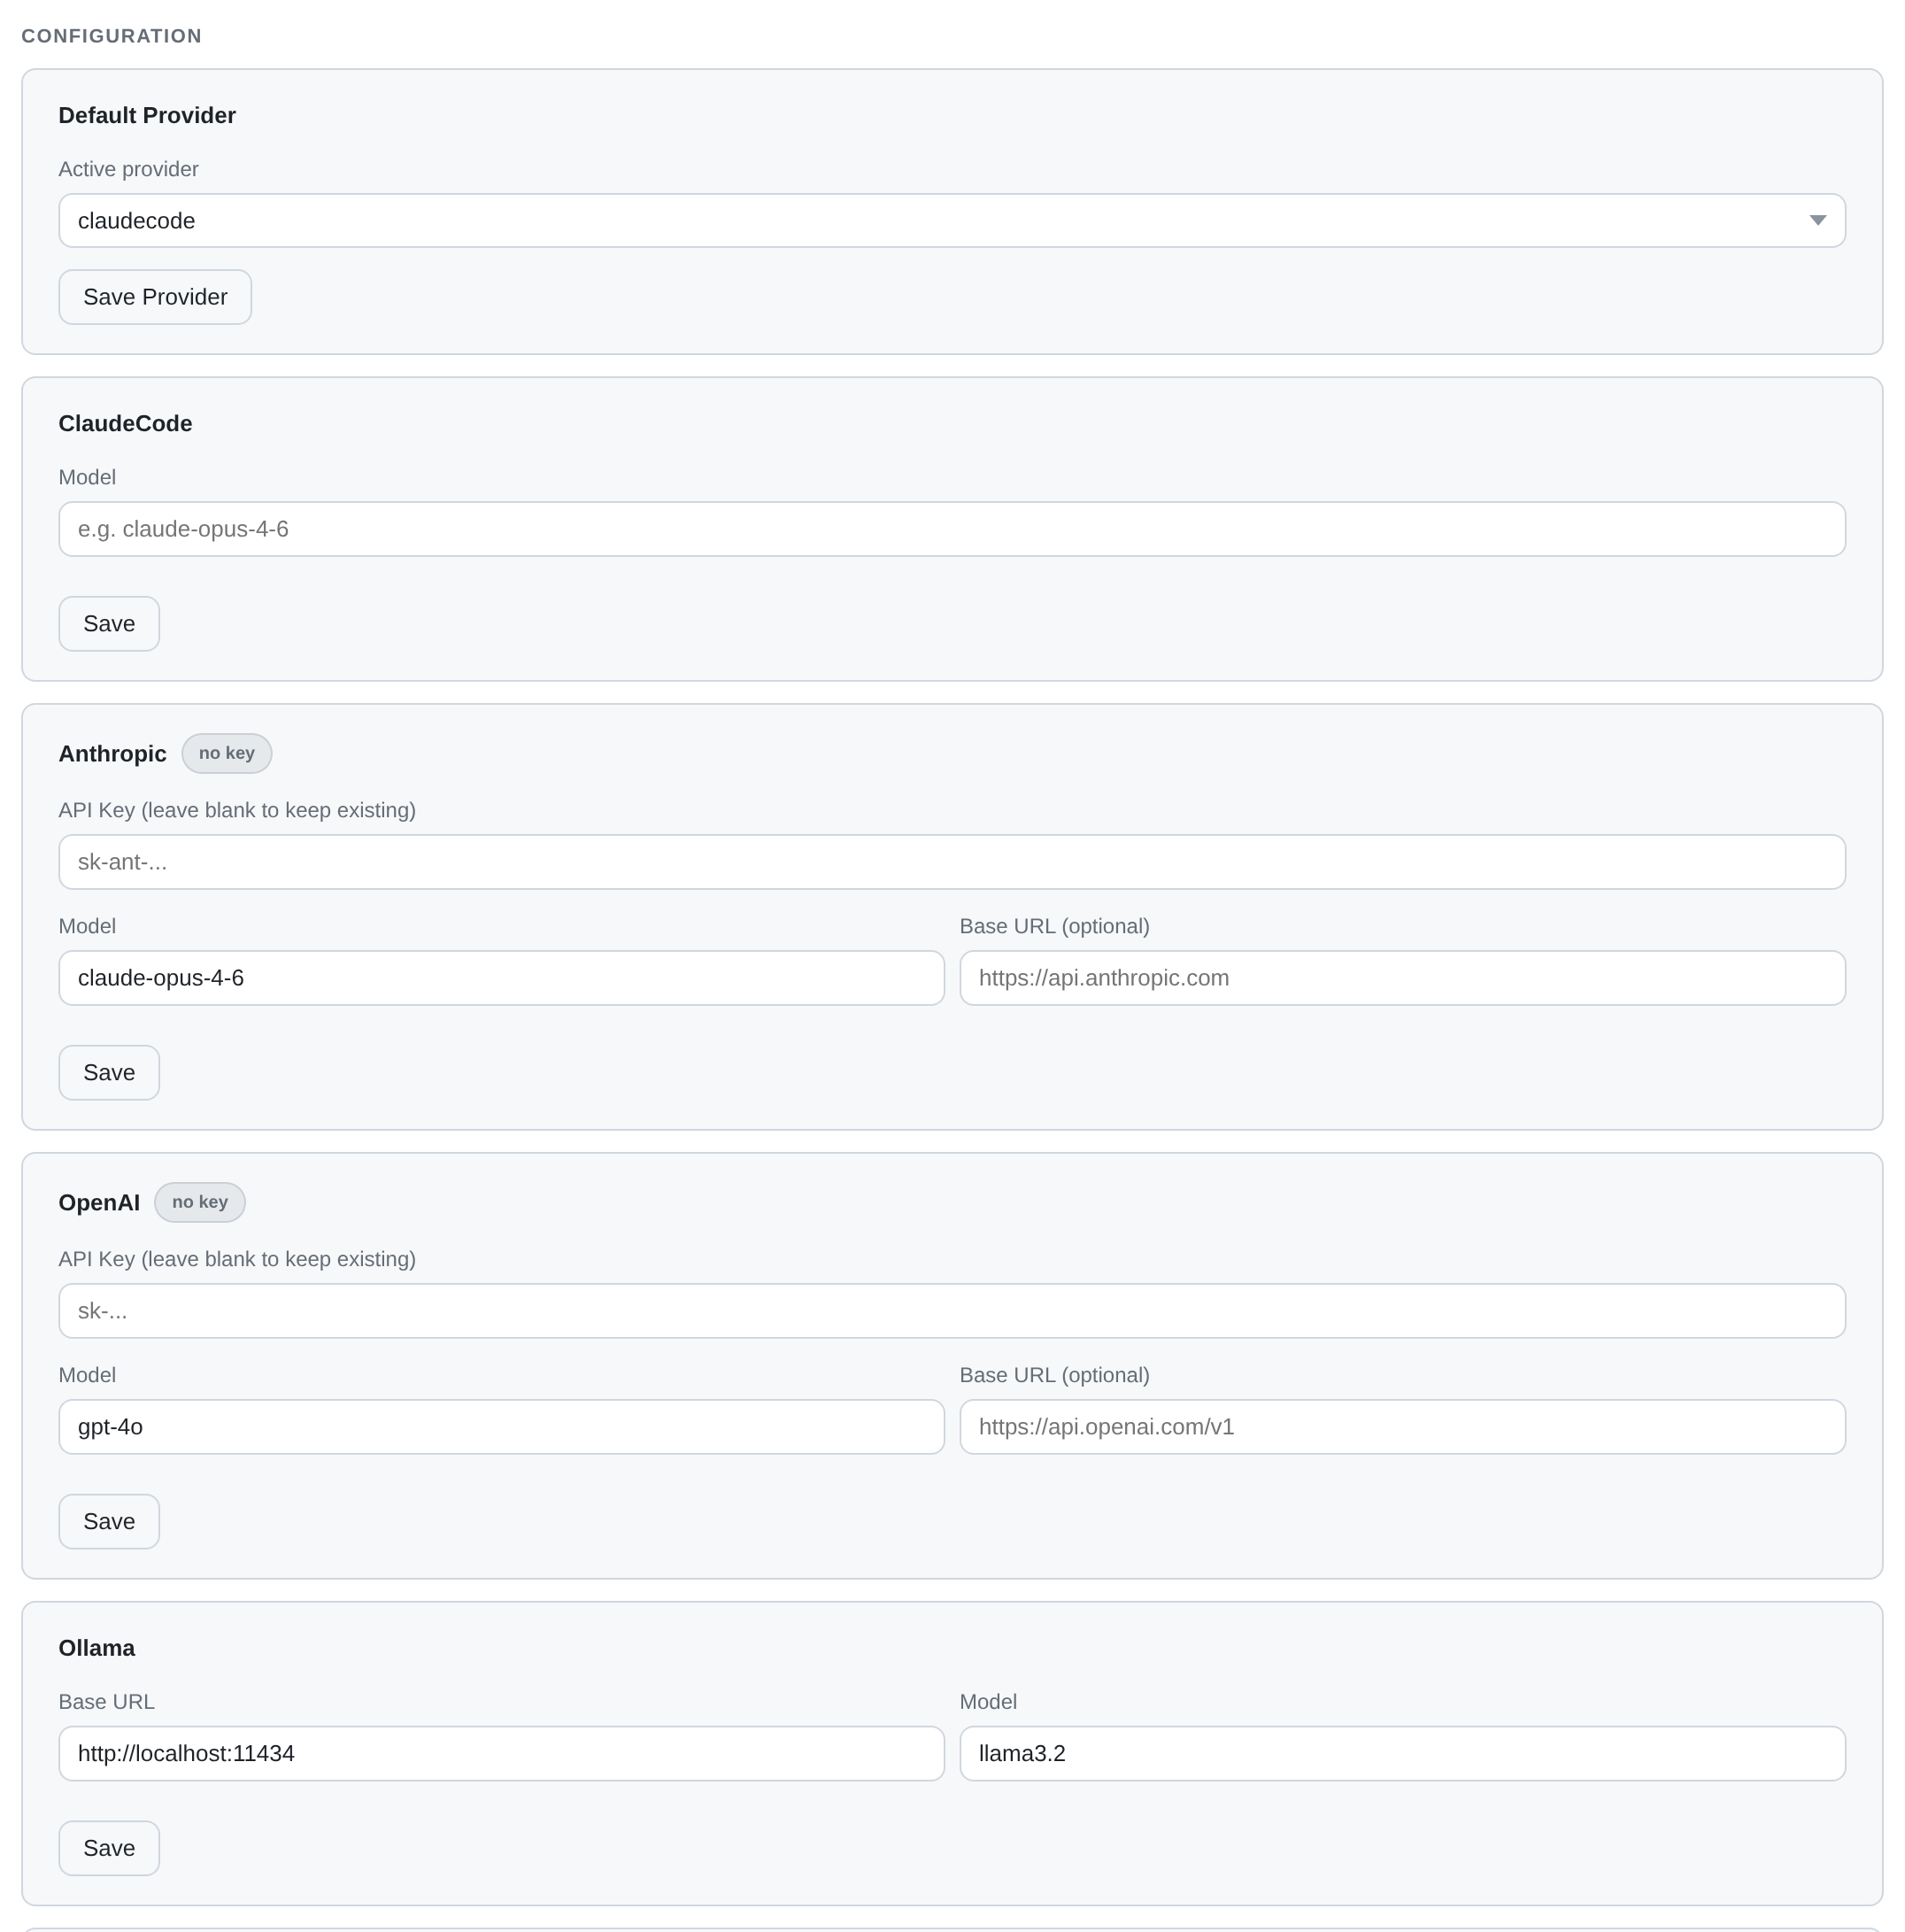
Settings applies to the whole hub. The Configuration section edits the
provider keys that cloop config set writes: the default provider, and the
model, base URL and API key of ClaudeCode, Anthropic, OpenAI and Ollama. Each
card saves on its own. API keys are write-only (a blank field keeps the current
key), and a no key badge marks a backend without one.
Choosing and configuring a provider explains each key.
Below it:
- Display glasses creates a personal link for Meta Ray-Ban Display glasses that expires after 30 days and can be revoked.
- Hidden Projects shows only how many projects you have hidden. Clicking it opens a dialog with an Unhide button for each, so their names don't appear on screen when you open this tab for something else.
- Danger Zone has Reset Project State, which clears the step history and resets the status but keeps the goal and configuration.
On the glasses
The link opens a separate, much smaller page, /glasses, that lists your
projects, one project's tasks, and single tasks. Apart from reading, it can only
add a task. It can't start a run, change an existing task, or reach anything
outside the glasses views. Tick Read-only when you generate the link to
turn off adding tasks too.
The glasses have no pointer and no keyboard. Each band or temple gesture reaches the page as an arrow key or Enter, so the page draws its own cursor:
| Gesture | What it does |
|---|---|
| Swipe left / right | Move the selection to the previous or next control. The selection wraps around, so swiping one way reaches every control. If you have scrolled away from the selection, it jumps to a control on screen instead of scrolling back. |
| Swipe up / down | Scroll. On a screen with nothing to scroll, they move the selection instead. |
| Pinch | Activate the selected control. With nothing selected, it brings the cursor back. |
The selected control has a blue ring, which is the only cursor. The page draws the ring itself rather than relying on the browser's focus outline, so it works however the browser handles focus. Nothing scrolls sideways: the layout is one column, so a sideways swipe always moves the selection. About once a minute the page fetches fresh data from the hub and updates only what changed, so a refresh doesn't move your selection or lose your place in a long task result.
Adding a task from the glasses
When the link may add tasks, a + Add task button sits above a project's task list. It opens a screen with the ways to compose a task that work on the device showing the page:
- 🎤 Speak a new task, if the device has a microphone. With Ray-Ban Display, that means the phone and not the glasses (see below).
- Ready-made tasks, a short list the hub builds from the project's plan. The first rows are for the newest failed or timed-out tasks (Fix the failure in task #63: …). The rest are general jobs for any project: review the recent changes for bugs, add tests for what changed, bring the documentation up to date. Each comes with a full brief for the agent, which doesn't have to fit on the display.
Either way, the next screen shows the task about to be created, with Add task and Discard, so a stray pinch can't create one. Discard takes you back to the Add screen, since after rejecting one task you usually want another.
With no microphone or text input on the glasses, and a band that only sends arrow keys and Enter, a list is the only way to compose a task there. Building it doesn't call a model, so opening the screen costs nothing.
Dictating a task
The Tasks tab has a Dictate button next to Add Task. Press it, say the task, and press it again. The recording goes to the hub and comes back as text, inserted at the cursor of the text field you were in (the description box, the task filter, or any text field you clicked into first), replacing any selected text. If no field had focus, the words are added to the end of the title. Nothing is submitted, so you can fix misheard words before you press Add Task. A toast says which field the words went into.
The button only appears when the hub has a speech backend configured, and the
browser only allows microphone access from an https origin (or localhost).
Dictating a change to a task
When you edit a task, the same button sits next to Description. There it asks what to do with your words, because the field already has text, and an addition ("…and make sure it works on mobile") can sound much like a replacement ("scrap that, this is really about the migration"):
| Replace | the details become what you said |
| Add to the end | the details keep their text and gain a paragraph |
| Edit with AI | what you said is an instruction, and the model applies it to the details that are there |
If you click into the Title first, the words go there without a question, since the question protects the description. (The dialog puts the cursor in the Title when it opens, but that doesn't count until you click or type there.)
The first two happen instantly, in the browser. The third sends the open draft,
including anything you have typed but not saved, to
POST /api/tasks/{id}/revise, and costs one provider call against the
project's budget. If the model is unavailable, the dialog stays open so you can
pick one of the other two.
None of the three saves anything. The text goes into the text box, and the task only changes when you click Save Changes, so you can read what the model wrote and cancel if it misheard. If the description was empty, there is no question and the words go straight in.
The glasses page offers dictation as 🎤 Speak a new task on the + Add task screen described above, with a confirmation step (the transcript, then Add task or Discard), because the wearer has no keyboard to fix a wrong word.
The glasses themselves can't record. Meta's developer guide lists the camera,
the microphone and getUserMedia as unsupported for Ray-Ban Display web apps,
so no web app on the glasses can hear anything. Dictation works on the phone
the glasses connect through: open the same saved link there. On the glasses,
the Add screen says so in one line and offers the ready-made tasks instead of a
button that can't work.
Configuring speech-to-text
The hub transcribes only with hosted Whisper on Groq. On your own machine,
cloop listen can fall back to a local openai-whisper CLI, but the hub never
does: that would start a Python process per request, fed with the caller's
audio, on the hub's host, which no host execution
forbids. So the hub needs an API key.
Set it in Settings → Speech-to-text, without a shell on the hub's host. The panel shows whether a key is in use and where it comes from, and can remove a key the hub stores itself. Or use the command line:
cloop config set stt.groq_api_key gsk_...     # or export GROQ_API_KEY
cloop config set stt.language en              # optional; empty auto-detects
The Settings panel writes the key to the hub's own .cloop/config.yaml, never
to the selected project's, because dictation reads only the hub's config:
/api/dictate and /api/transcribe are called without a project index. That
is why speech-to-text has its own endpoint, GET/PUT/DELETE
/api/config/stt, rather than a key on /api/config/set. The key is never sent
back to the browser, only whether one is set.
| Key | Default | What it does |
|---|---|---|
stt.groq_api_key |
$GROQ_API_KEY |
Credential for hosted Whisper. Required for dictation in the web UI. |
stt.model |
whisper-large-v3-turbo |
Hosted model. |
stt.endpoint |
Groq's URL | Point at any OpenAI-compatible transcription server. |
stt.language |
auto-detect | ISO-639-1 hint, e.g. en, de. |
stt.provider |
auto | groq or whisper. Only cloop listen honours whisper. The hub only uses the hosted service. |
stt.whisper_model |
base |
Local CLI model, for cloop listen. |
A project's own .cloop/config.yaml overrides the hub's field by field, so one
key on the hub serves every project, and a project can set a different
language locally. Without a key, the button stays hidden and
GET /api/dictate explains what is missing.
Live updates
The dashboard keeps a WebSocket open at /api/ws, and falls back to
Server-Sent Events at /api/events when a proxy blocks the upgrade. Task
changes, state diffs, runs starting and stopping, step output, provider calls,
executor health and presence all arrive this way. Nothing polls, and two people
looking at the same project see the same thing. When two people edit one task
at once, the conflict is detected and reported, so neither edit is lost
unnoticed.
Beyond one user on one machine
Everything above assumes the default: one person, one host, and work running as a child process of the dashboard. A shared or hosted deployment needs two more decisions, each with its own documentation.
- Who may do what. The security model covers SSO, sessions, roles and scoped API tokens. Read it before you expose the port, because the defaults on this page are for one person on one machine. Turning SSO on also gives each user their own Claude Code sign-in on the Budget tab, which is otherwise one account for the whole hub. See per-user Claude Code logins.
- Where the work runs. Running the harness next to the dashboard is fine on
a laptop, but not when a model writes the code on someone else's behalf.
The configuration reference
covers container, Kubernetes and remote executors, and the
executors.allow_host_process: falsesetting that turns off host execution entirely.
Each executor card in the Executors tab has three admin dialogs: Sandbox (host or container, and a container's engine, runtime and image), Limits (the most CPU, memory, disk and processes any one workload there may get) and Access (which users and groups may run work on it). An executor with an empty access list is open to everyone, and every executor starts that way. See who may use an executor. - Running it day to day. The operator runbook covers backups, upgrades, key rotation and incident playbooks.
See also: core concepts, your first project, and the command reference.