A walkthrough of the dashboard
Your first project goes through a first run from the terminal. This page does the same from the browser, in three steps: you decide where work is allowed to run, create a project that runs there, and then add tasks and start it.
Do these in that order. Executors (the places where work runs) belong to the whole hub, and each project points at one. If you create a project before there is a suitable executor, it runs wherever the hub accepts it, and on a default install that is a child process of the dashboard itself.
- Before you start
- 1. The fleet view
- 2. Decide where work runs
- 3. Add a device
- 4. Create a project
- 5. The project's control panel
- 6. The plan
- 7. Run it, and watch
- 8. Settings
- Where to go next
The screenshots come from a real, throwaway hub with three invented projects,
which scripts/screenshots/capture.sh builds from scratch.
Before you start
The dashboard starts on port 8080 and opens in your browser. With no token and
no SSO configured, it doesn't ask anyone to sign in, so it only listens on
127.0.0.1. That is the right default for a laptop. Before you put the
dashboard on a network, read
what it authenticates by default.
To reach it from other machines, set up OIDC first. The
hub then listens on every interface.
1. The fleet view
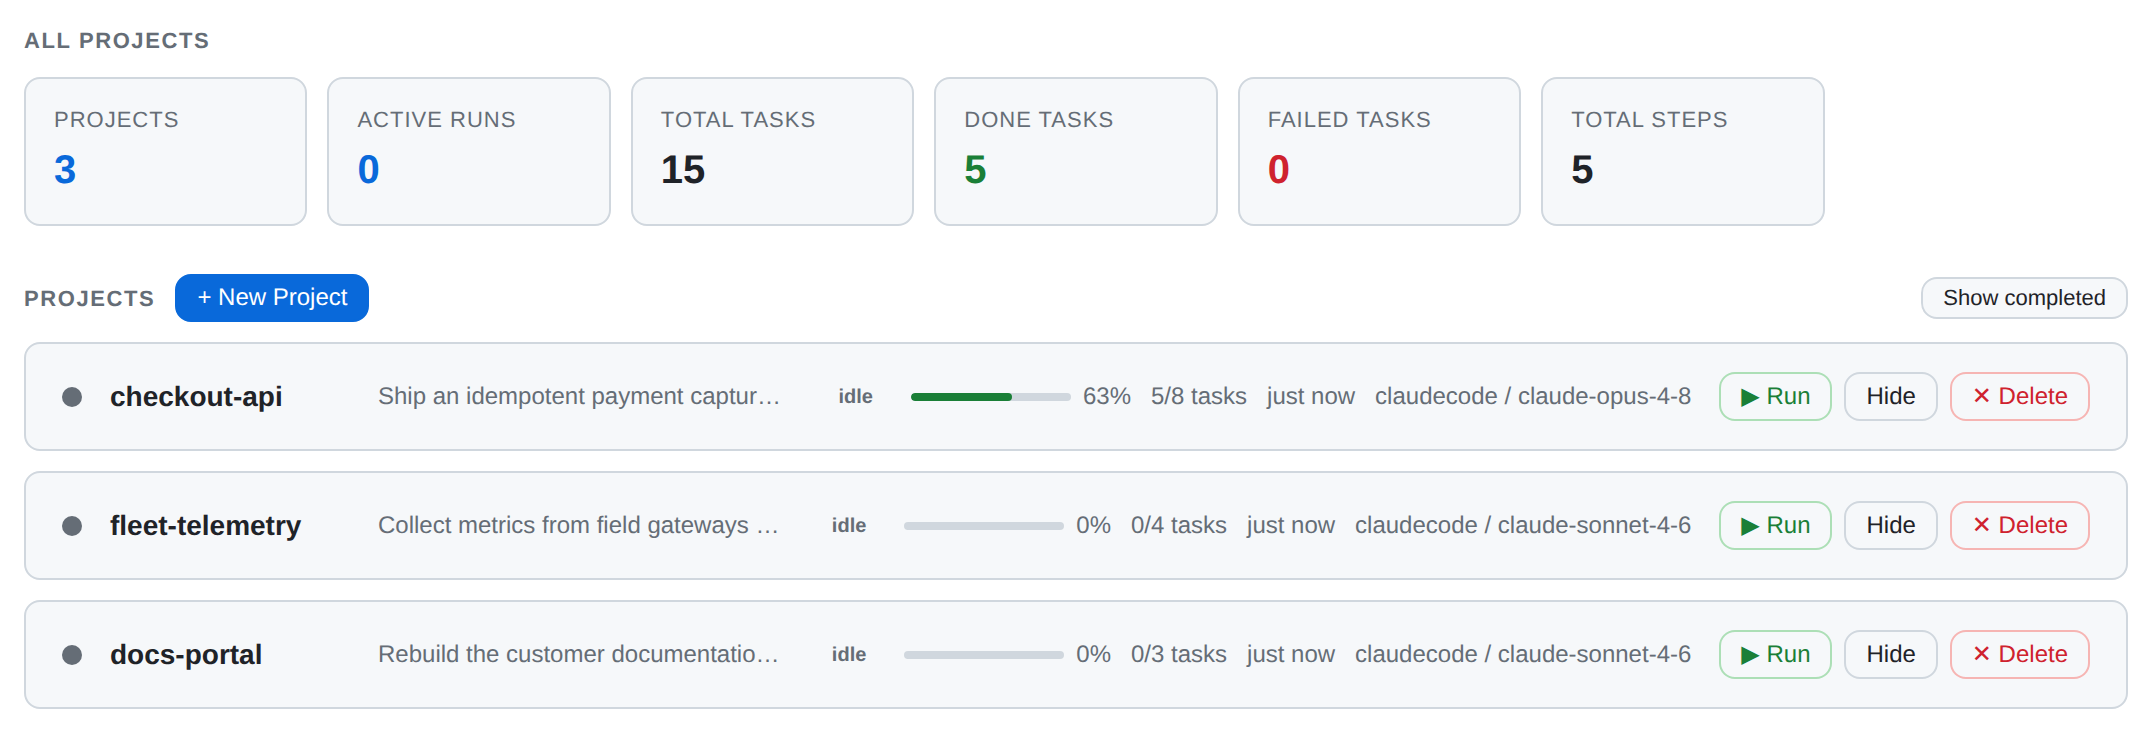
Projects is the hub's front page, and the only tab that shows the whole hub
at once. Counters run across the top. Below them is one row per registered
project, with its goal, a status pill, a progress bar, done/total tasks, when
it last did anything, and the provider and model it will use on its next run.
Click a row to open that project in the Project tabs, to the left of the divider in the tab bar. The tabs to the right of the divider (Projects, Budget, Executors, Settings) are hub-wide. The two groups are labelled because a setting you change on a Global tab changes it for every project on the hub.
2. Decide where work runs
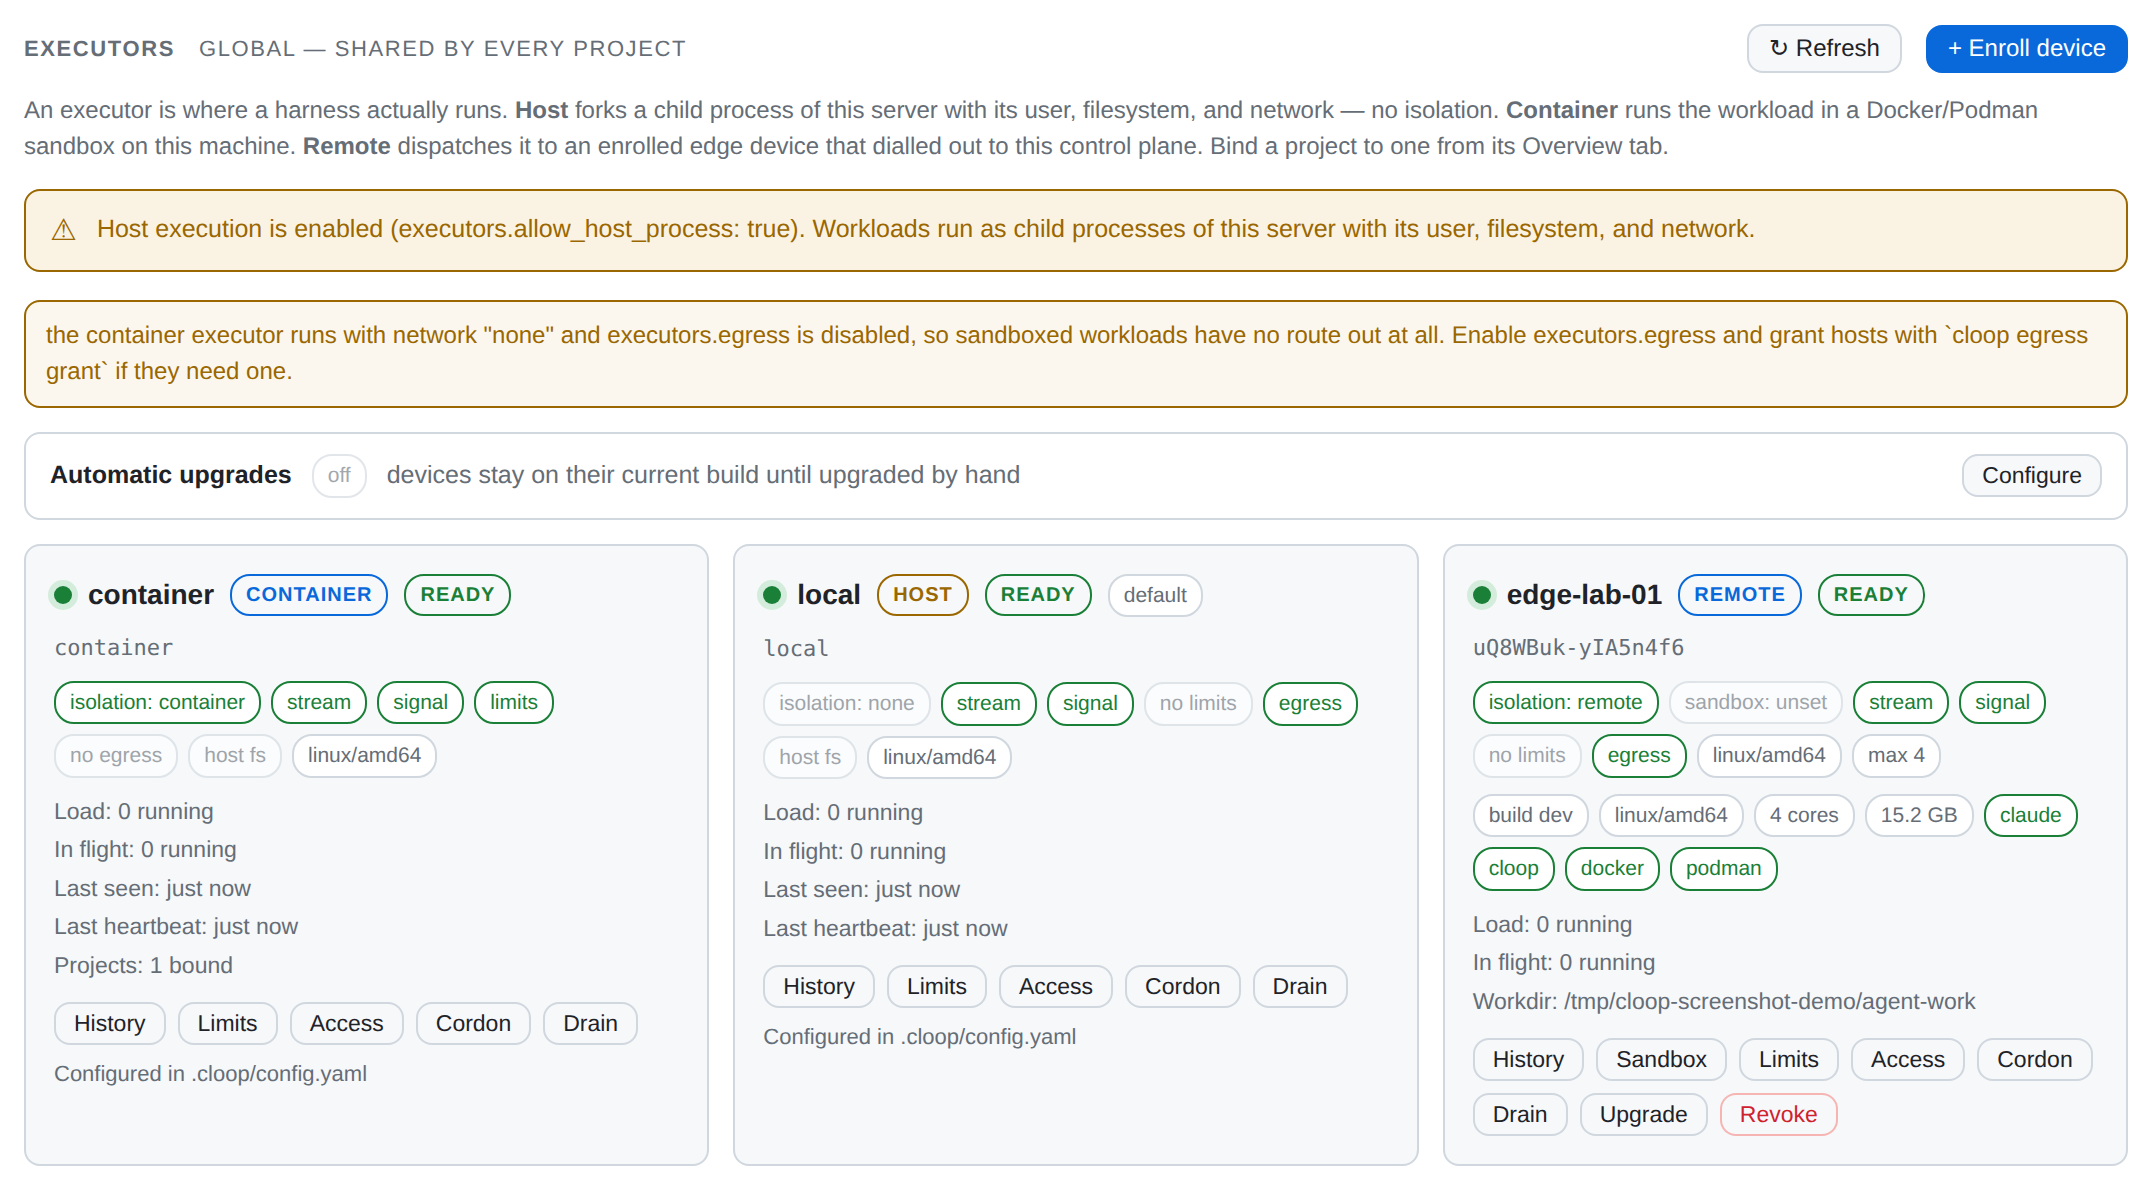
An executor is where a harness runs. The Executors tab lists all of the hub's executors. To decide whether a project should use one, look at two things on its card: what it isolates, and whether it is reachable right now.
| Kind | What runs where | What a task can reach |
|---|---|---|
localprocess |
a child process of the dashboard | this server's user, filesystem and network, with no isolation |
container |
a Docker/Podman sandbox on this server | only what the sandbox spec and the egress rules allow |
remote |
an enrolled device that dialled out to the hub | that device, under the sandbox mode set on its card |
kubernetes |
a Pod in a cluster | its namespace, under a per-Pod NetworkPolicy |
Read the two amber banners at the top of the tab. The first says that host execution is enabled
(executors.allow_host_process: true). That is the default, and most of this
documentation recommends turning it off once you have a better place to run
work. The second says that the container executor is on network none, so
sandboxed work has no network access at all. A project that needs to reach a package
registry needs egress configured
or a grant from the egress broker.
You manage an executor with the buttons on its card:
- History shows in-flight work, recent completions, and whether anything ran on the host.
- Sandbox (enrolled devices only) sets whether work runs on the device's
host or in a container on it, and under which runtime. For a driver the hub
builds itself, this is already set in
config.yaml, so its card has no Sandbox button. - Limits sets the most CPU, memory, disk and processes that any one workload on this executor may get.
- Access sets which users and groups may place work on this executor.
- Cordon stops new work from being placed here without disturbing what is running. On an enrolled device it also takes back the credentials the device holds. Drain retires the executor and waits for in-flight work to finish.
- Upgrade and Revoke are for enrolled devices only.
Use Cordon or Drain before you do anything destructive to an executor. A
cordoned executor keeps its running work and takes no new work. cloop executor
cordon and drain do the same from a terminal, and report which hub member
took the device's credentials back.
3. Add a device
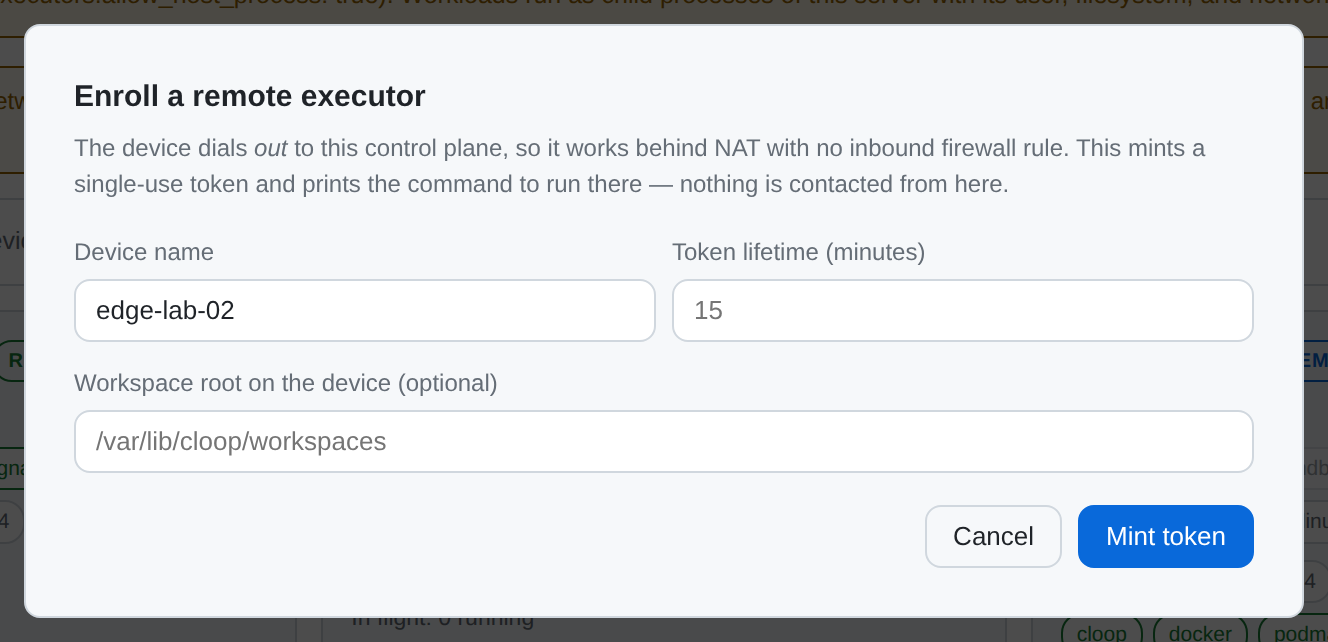
+ Enroll device creates a single-use token and shows the command to run on the machine you are adding:
cloop executor agent --server wss://hub.example.com/api/executors/connect \
                     --token <the token it printed>
The device connects out to the hub, so a laptop, a build box or a machine on a factory network behind NAT can join without an inbound firewall rule or a forwarded port. The hub never connects to the device.
The token works once and expires after 15 minutes by default, and the dialog
shows it only once. A lost token can't be recovered, but creating another takes
one click. Once the agent connects, the device appears as a remote card that
shows its build, its CPU and memory, the container runtimes it found and the
harnesses it has installed.
Set its Sandbox mode and Limits before you point a project at it.
Edge-device onboarding has the full details, including the hardened systemd unit and certificate pinning.
4. Create a project
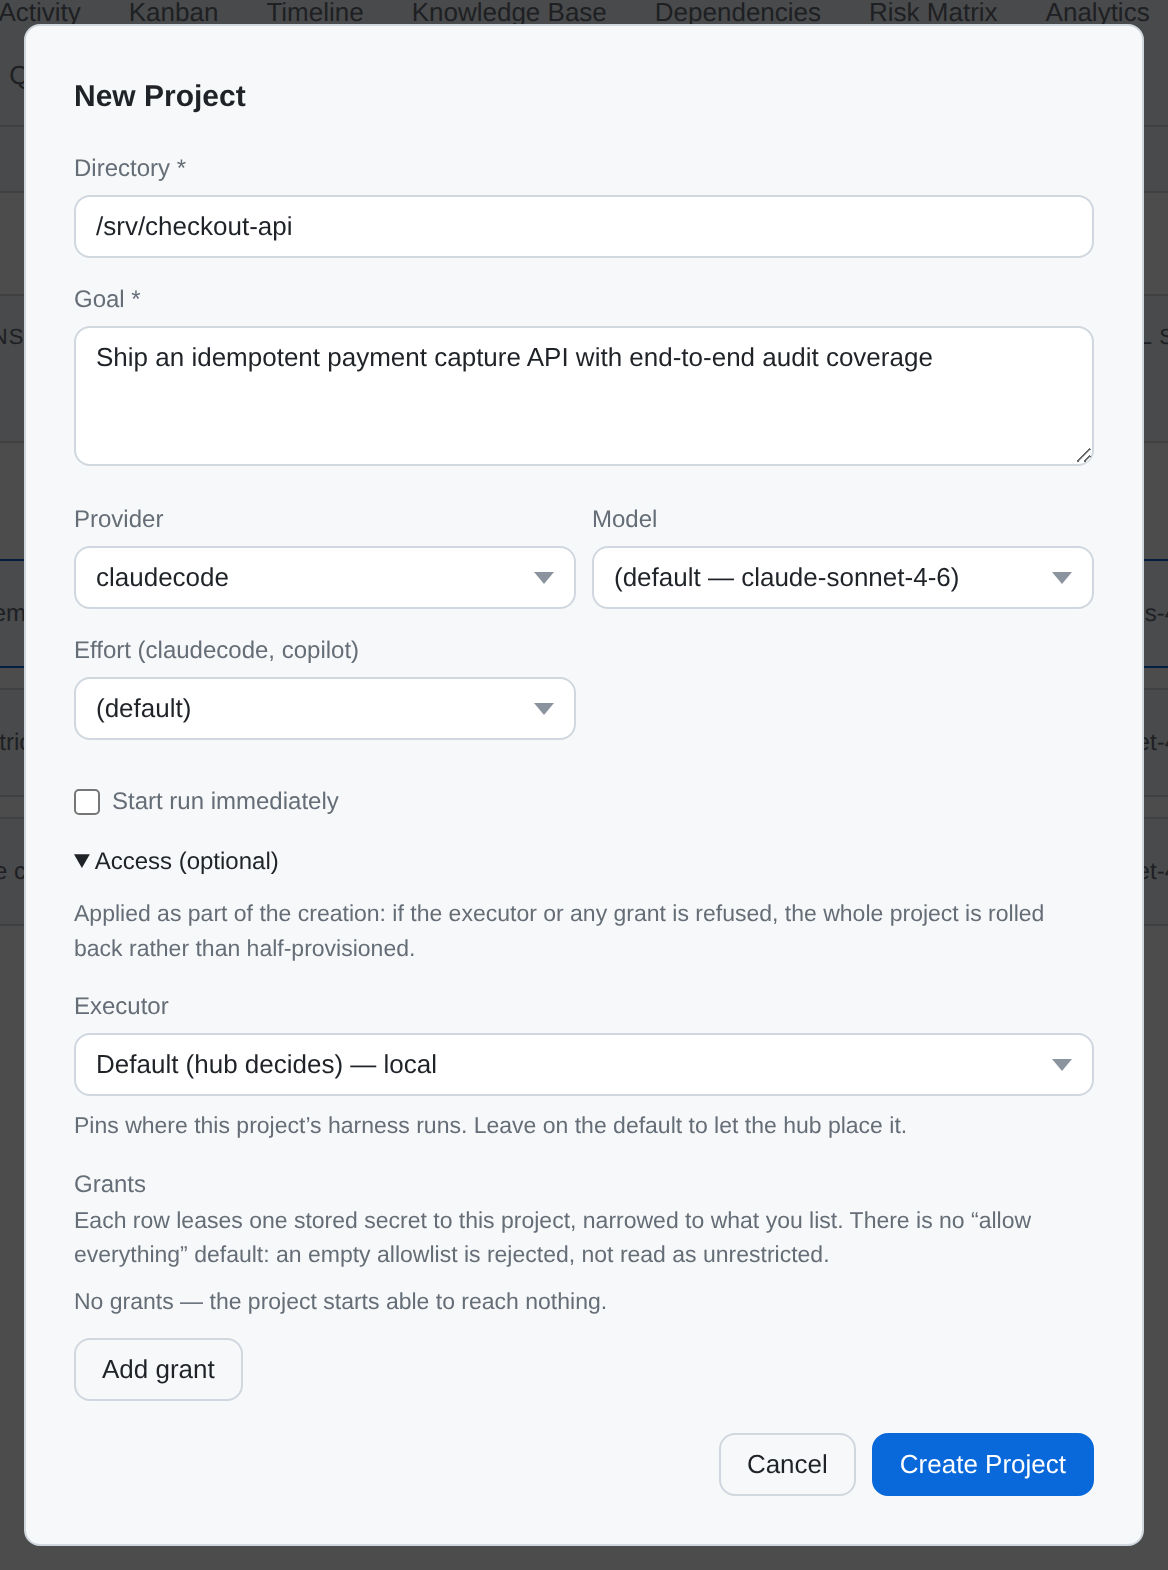
+ New Project on the Projects tab needs a directory and a goal. Everything else in the dialog is optional.
cloop turns the goal into the plan, so a goal that names an outcome and its constraints produces a better plan than one that only names a technology. "Ship an idempotent payment capture API with end-to-end audit coverage" gives the planner something to work with. "payments" doesn't.
Open the Access section. It is collapsed by default because an ordinary single-user project needs neither of its two settings, but it is the part of this dialog that this walkthrough is about:
- Executor pins where this project's harness runs. If you leave it on Default (hub decides), the hub chooses, and on a default install that means the host.
- Grants lease stored secrets to the project: a GitHub repository, a personal access token, a kubeconfig, or an allowance on the hub's own Internet connection. Each row scopes one credential to this project.
Both are applied when the project is created. If the executor or any grant is refused, the whole project is rolled back, so a mistyped secret name doesn't leave a half-created project behind.
A device doesn't get your Claude login. Signing in to Claude Code from Settings
only authenticates harnesses that run on the hub itself. A harness in a
container, in a Pod or on an enrolled device gets credentials only through a
grant (why).
So a claudecode project bound to one of these also needs a Claude credential
granted to it: CLAUDE_CODE_OAUTH_TOKEN (from claude setup-token) or
ANTHROPIC_API_KEY.
The hub checks for one before it starts anything. If there is none, or the
sandbox would lose it within ten minutes, Run is refused with
harness_credential_missing (or _expiring) and the name of the executor, and
no sandbox starts. The project's Overview shows a red Claude credential card
beside the Executor card. The refused Run and the card both open a dialog that,
in one step, either grants an env secret you already have, or takes a token
pasted from claude setup-token and stores it as your own secret. The grant
lasts 30 days unless you choose otherwise, and the card turns amber three days
before it ends. On a hub with single sign-on, that personal token is only used
for runs you start. Other people on the project need their own token or a shared
one (details).
Repositories work the same way, with one default to watch. The project's
Repositories panel assigns Read only unless you pick Read and write, and
read-only access is enough to clone but not to push. You can limit Read and
write to particular branches, for example cloop/* to keep the agent off
main. The hub's git proxy enforces that limit. On a hub without the proxy, a
GitHub App assignment with branches is delivered read-only instead
(why). The
harness is told which repositories it has, whether it may push and to which
branches, and it clones them itself.
When the Grants list is empty, it says "No grants — the project starts able to reach nothing." Nothing in this dialog defaults to allowing everything. An empty allowlist is rejected as a mistake instead of being read as "unrestricted" (see secrets and egress).
5. The project's control panel
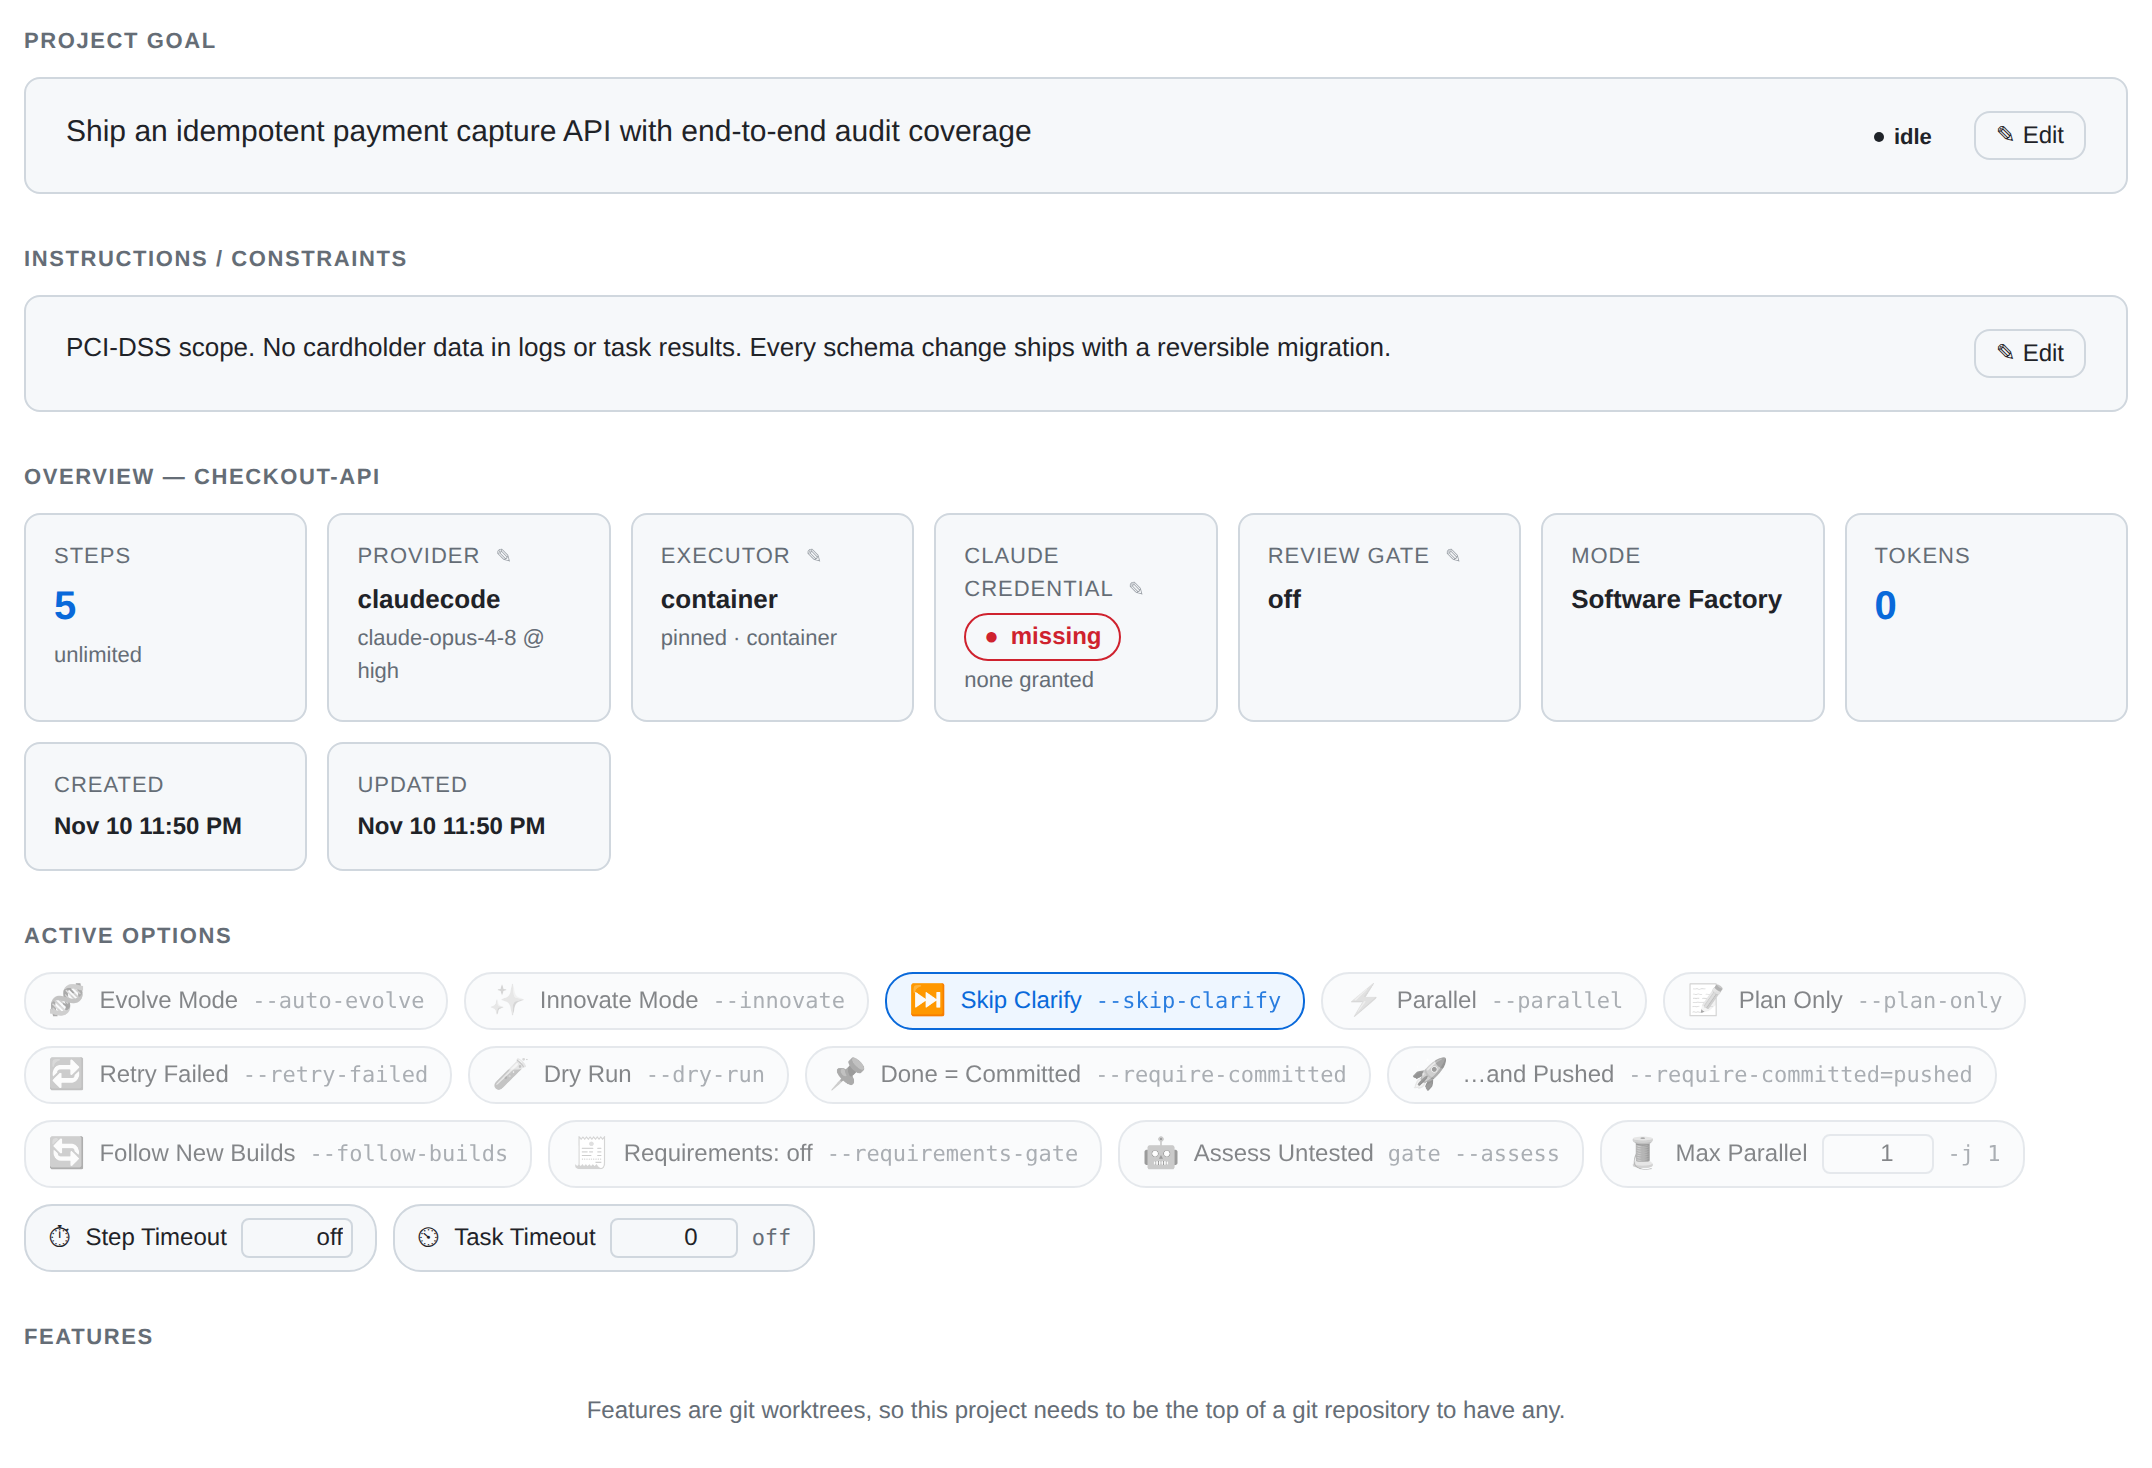
Click a project to open its Overview. From top to bottom it shows the goal, instructions, stats, options, controls, live output and event history.
Four of the stat cards are also buttons. Claude credential opens the grant dialog described in the previous section, and Review gate sets up a reviewer model that checks each task's changes before they are pushed or merged. Provider opens a provider and model picker. Your choice is saved on the project and used by every run until you change it. Executor opens the dialog this walkthrough is about:
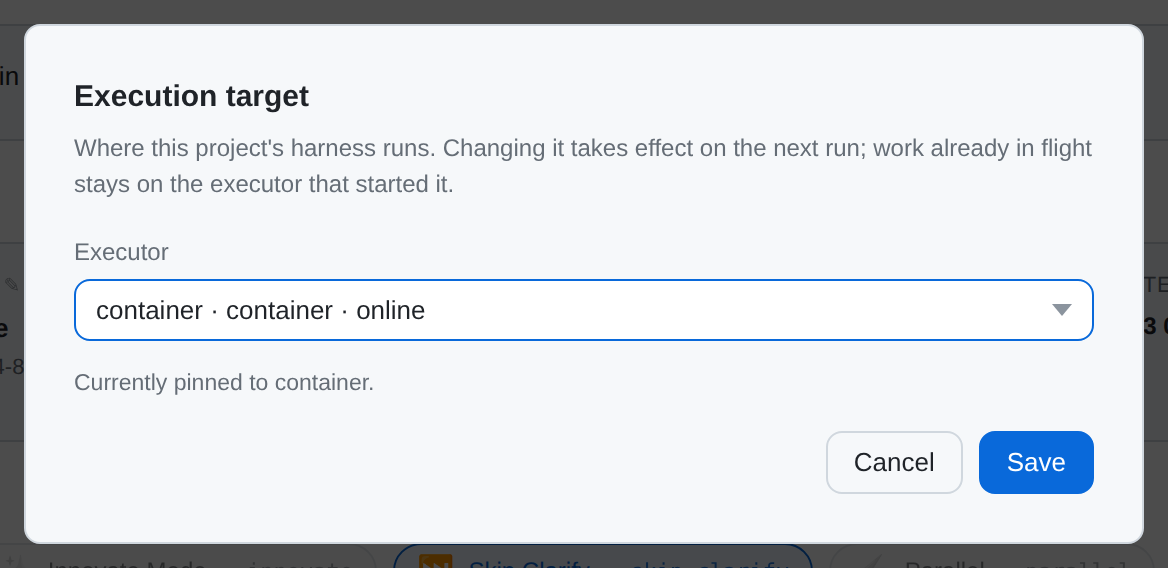
The Executor card reads pinned or default. That tells you whether someone chose where this project runs, or whether the hub decides. A change here takes effect on the next run. Work already in flight stays on the executor that started it, because a running task can't be moved safely between machines.
Active Options holds the run flags. Click a badge to turn a flag on or off;
the Run button has no options dialog. The flags are stored on the project, so
the dashboard and the CLI use the same ones: a badge you turn on here is a flag
that cloop run will use. Max Parallel, Step Timeout and Task Timeout are
in the same card. A new Task Timeout also applies to tasks that are already
running, within a few seconds, and not only to the next one.
6. The plan
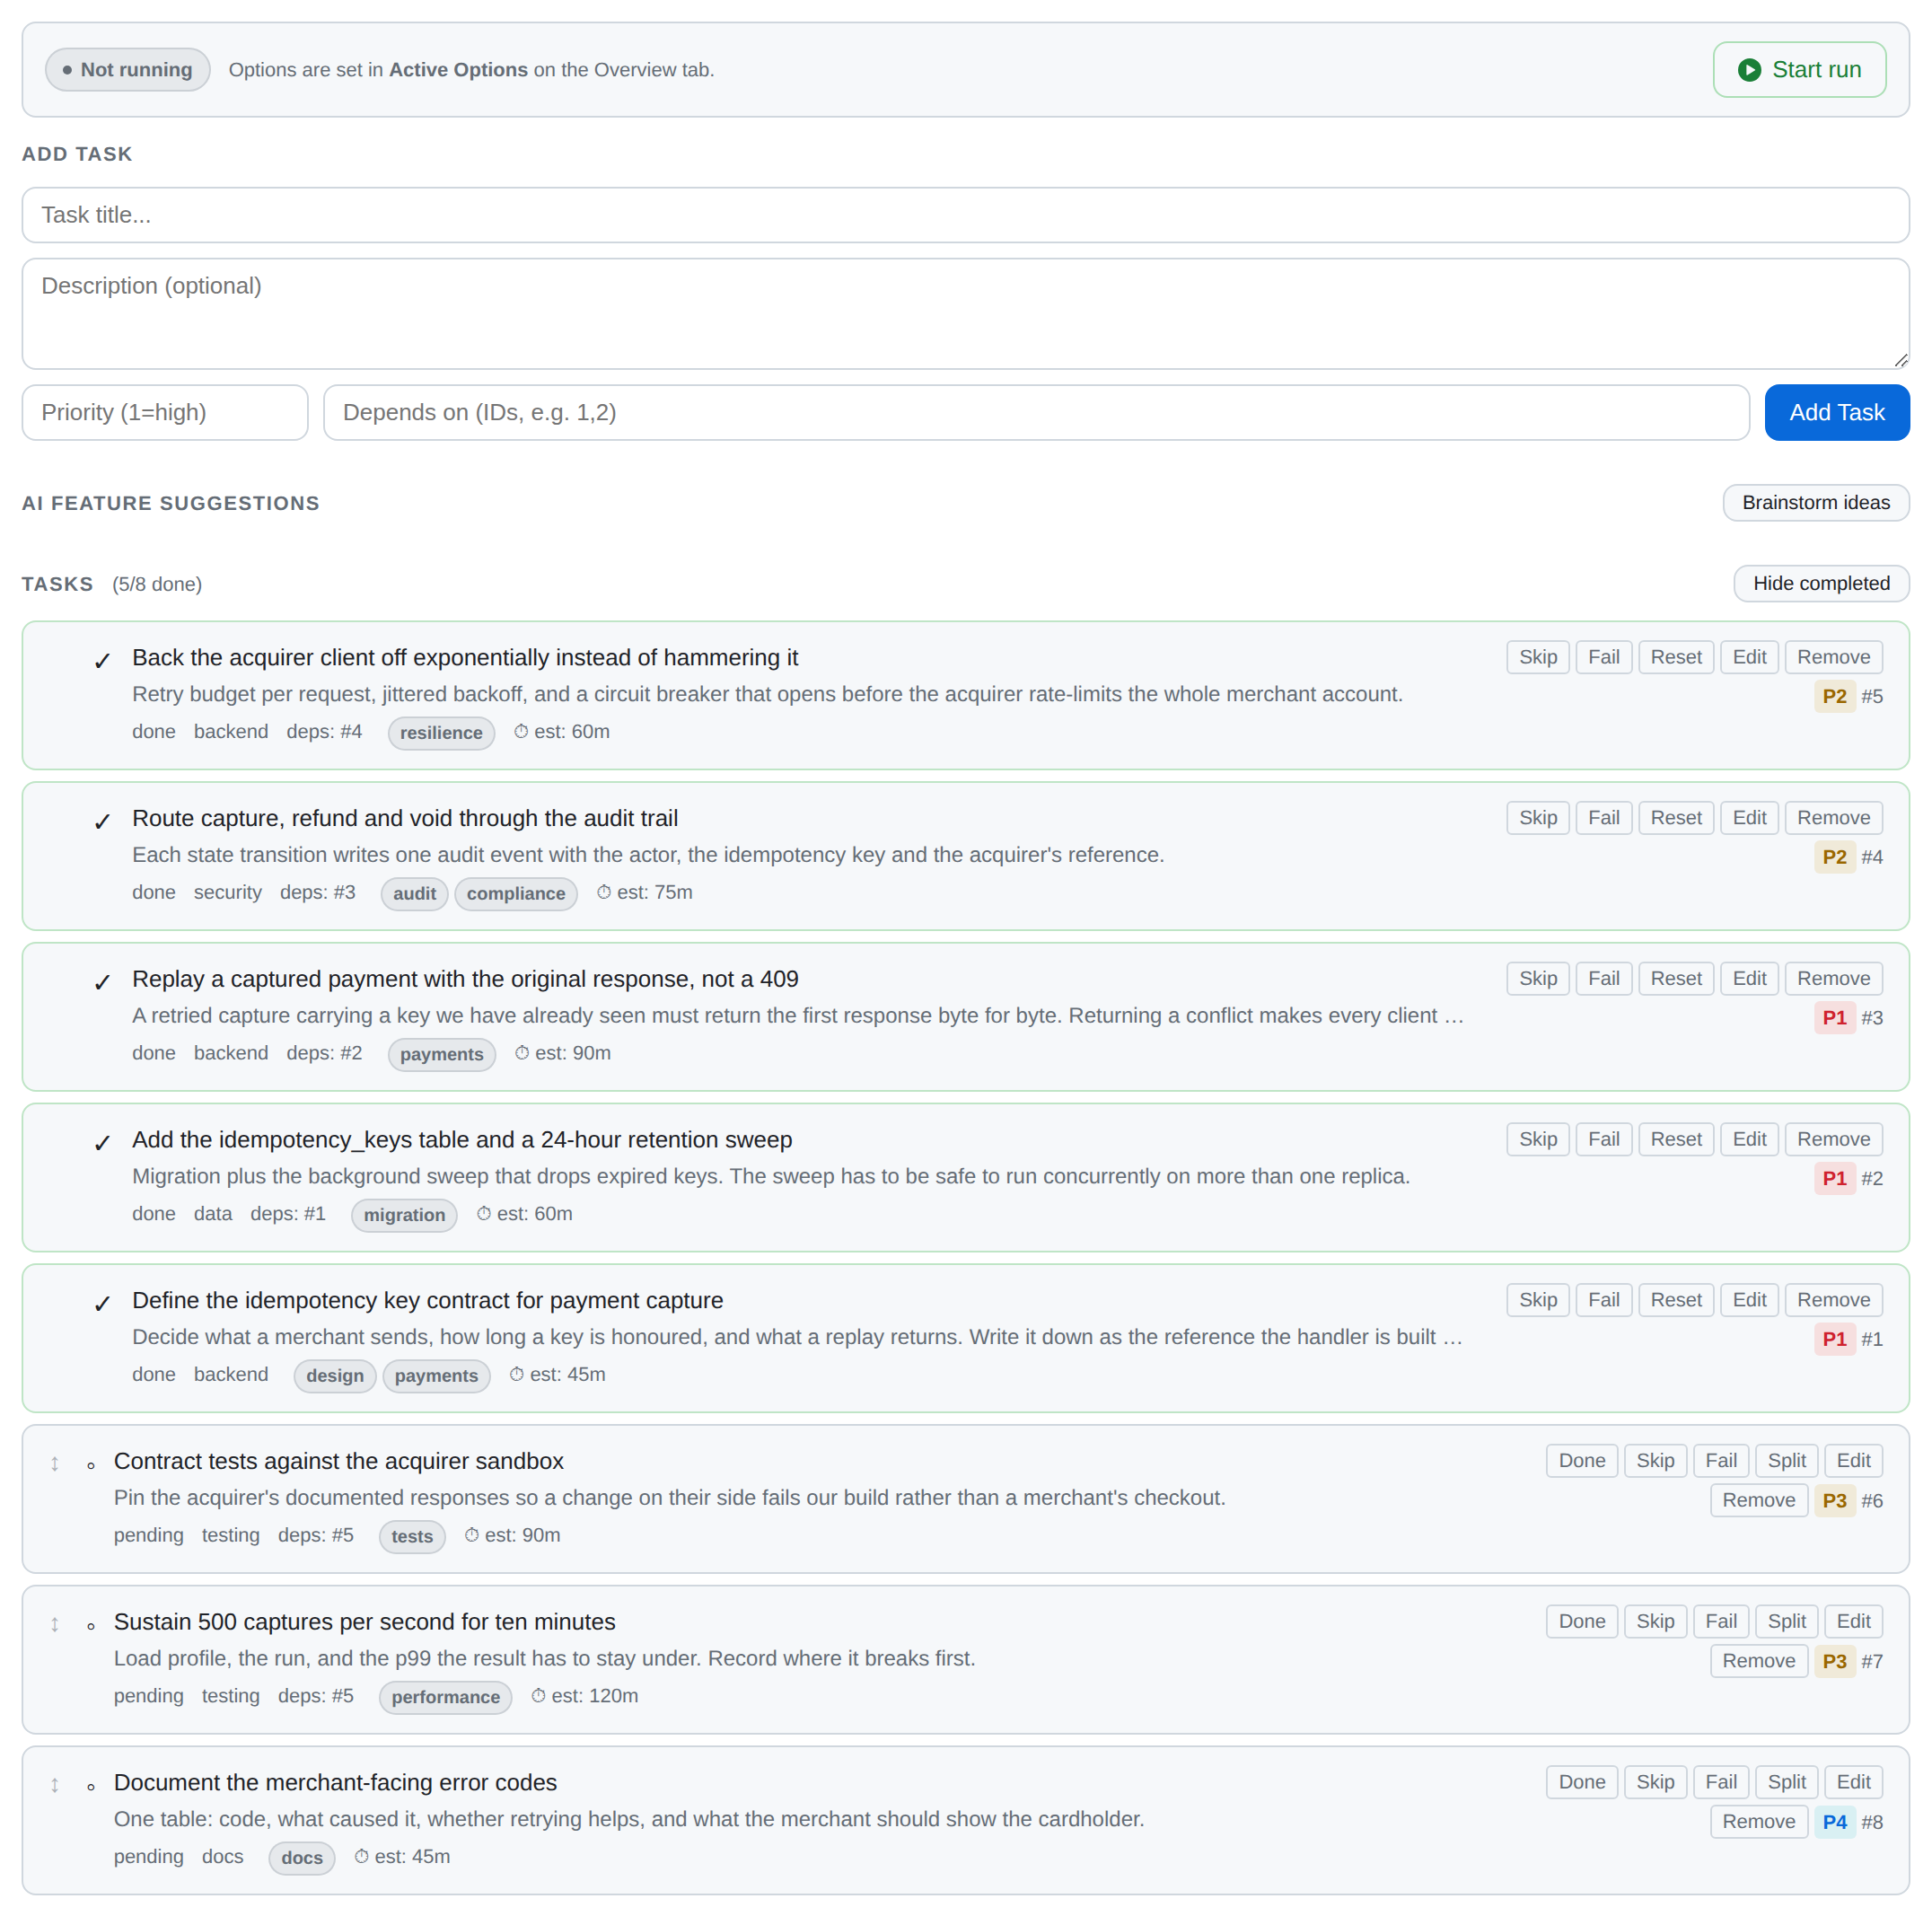
The Tasks tab shows the plan. Each row is a task with an ID, a status and, once it has run, a stored result. Because results are stored per task, progress survives a restart, and a failure shows which task it belongs to.
To add a task, fill in the inline form: a title, an optional description, a
priority (1 is highest) and a comma-separated list of the task IDs it depends
on. Add Task adds it straight away, whether or not a run is going. The
description is the brief the agent works from, so its box takes several lines:
Enter starts a new line, and Ctrl+Enter (⌘+Enter on a Mac) adds the task.
Decompose, next to it, takes the same fields but asks the AI to break the
task into several smaller ones. They are proposed below the form, each with the
priority and dependencies you typed, and you can add them one by one or all at
once.
The list is also the run queue. Tasks run from top to bottom, and dragging a row changes the priorities the scheduler reads. This works during a run too, because the orchestrator reads the order again on every iteration. Three rules apply:
- Dependencies come first. A task dragged to the top still waits for the tasks it depends on. The order only decides between tasks that are ready to run.
- Only pending tasks have a position. Completed and running rows have no drag handle, because both have already left the queue.
- Pinned tasks stay at the top. A drag across the divider below them is refused, and nothing changes.
The screenshot above has Show completed turned on. By default finished tasks are hidden, and the header says how many. Each done task shows the summary the run produced, so the list still makes sense weeks later.
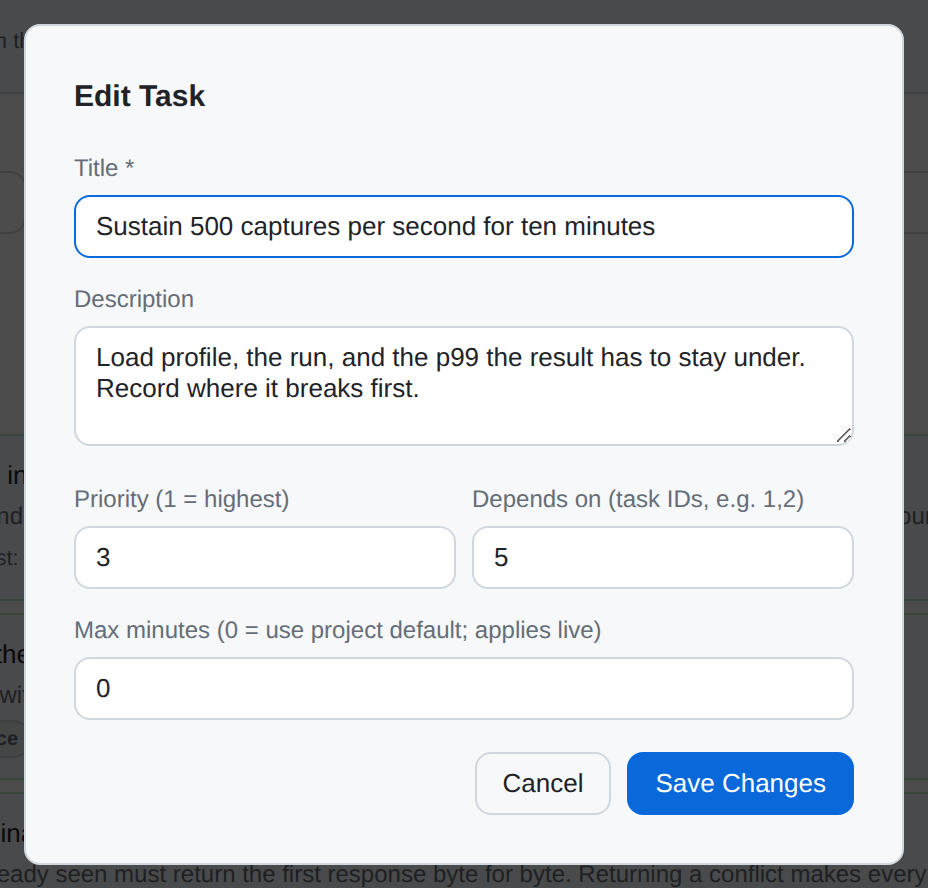
Edit opens the same fields plus a per-task Max minutes budget, where 0
means the project default. The other buttons on a row set its status directly,
and which ones a row has depends on its current status. A pending task has
Done, Skip, Fail, Split, Edit and Remove. A finished
task has Reset in place of Done and Split, since there is nothing left to
mark done or split. After a failure, use Reset to put the task back in the
queue. Setting the status of a task that is running also aborts the task.
The same plan is also shown as Kanban (four draggable columns), Timeline (a Gantt chart), Dependencies (a graph) and Activity (every execution, heal retry and evolve cycle for each task).
7. Run it, and watch
Start run is at the top of the Tasks tab, so you can start the plan from the page where you edited it. The same button is on the Overview and on every row of the Projects tab, and they all do the same thing. Next to it you see the project's status, worded as on the Overview (a paused project says why), and an Evolve Mode chip when that option is on.
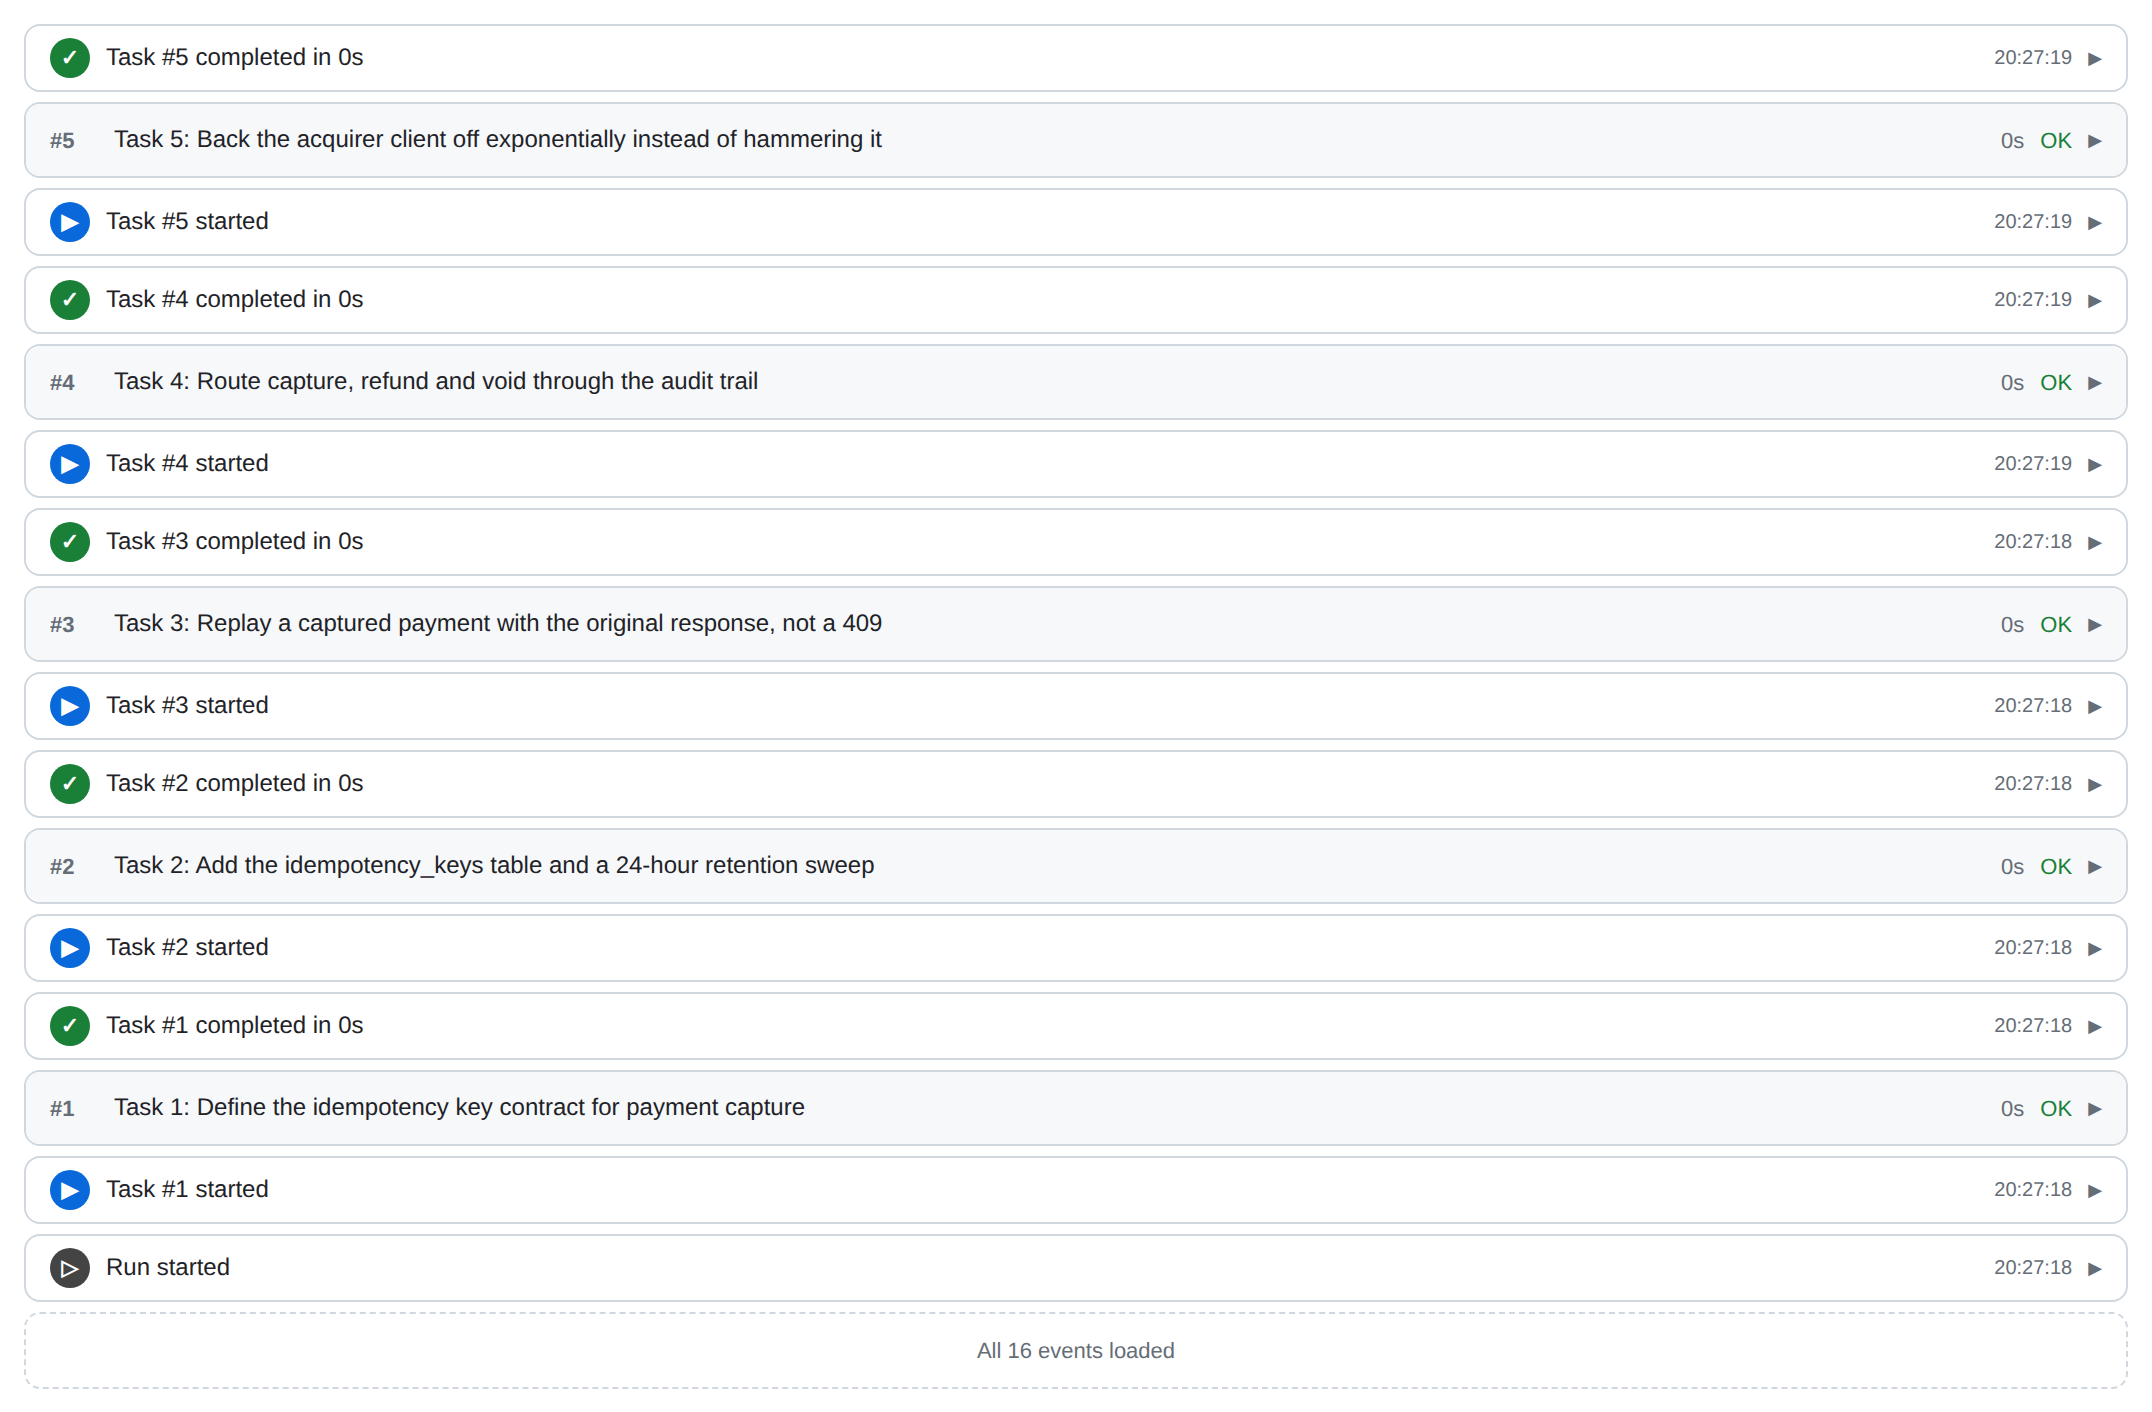
Event History on the Overview records what happened, in one stream: steps, and also task starts, completions, failures, skips, heal retries, evolve cycles and manual status changes. Live Output above it shows the running step's output as it arrives. The hub pushes both over a WebSocket, so they stay current without a refresh. Behind a proxy that blocks the WebSocket upgrade, the page falls back to server-sent events and keeps working.
A run on an enrolled device reports back when it ends. The plan on the dashboard belongs to the hub, and a run on a device works on a copy that is sent with it. While the run is going, Live Output streams from the device, but the task list doesn't change. When the run ends, the device sends back what changed (the tasks it finished or added, its steps, events and spend), and Event History gets a project_result row that says what came back. If you changed a task on the hub while the run was away, your change is kept, and the row says so too. If the agent is too old to report back, the row says that it needs an upgrade. Upgrade on the device's card fixes that.
When every task is done, the run stops. With Evolve Mode on, the agent proposes new work instead, and the new work is added as tasks that you can review and reject. How cloop works explains what it looks at when deciding. While it decides, the project shows Evolving and the run is still live. Pause / Stop ends the round, and the next start picks it up again.
8. Settings
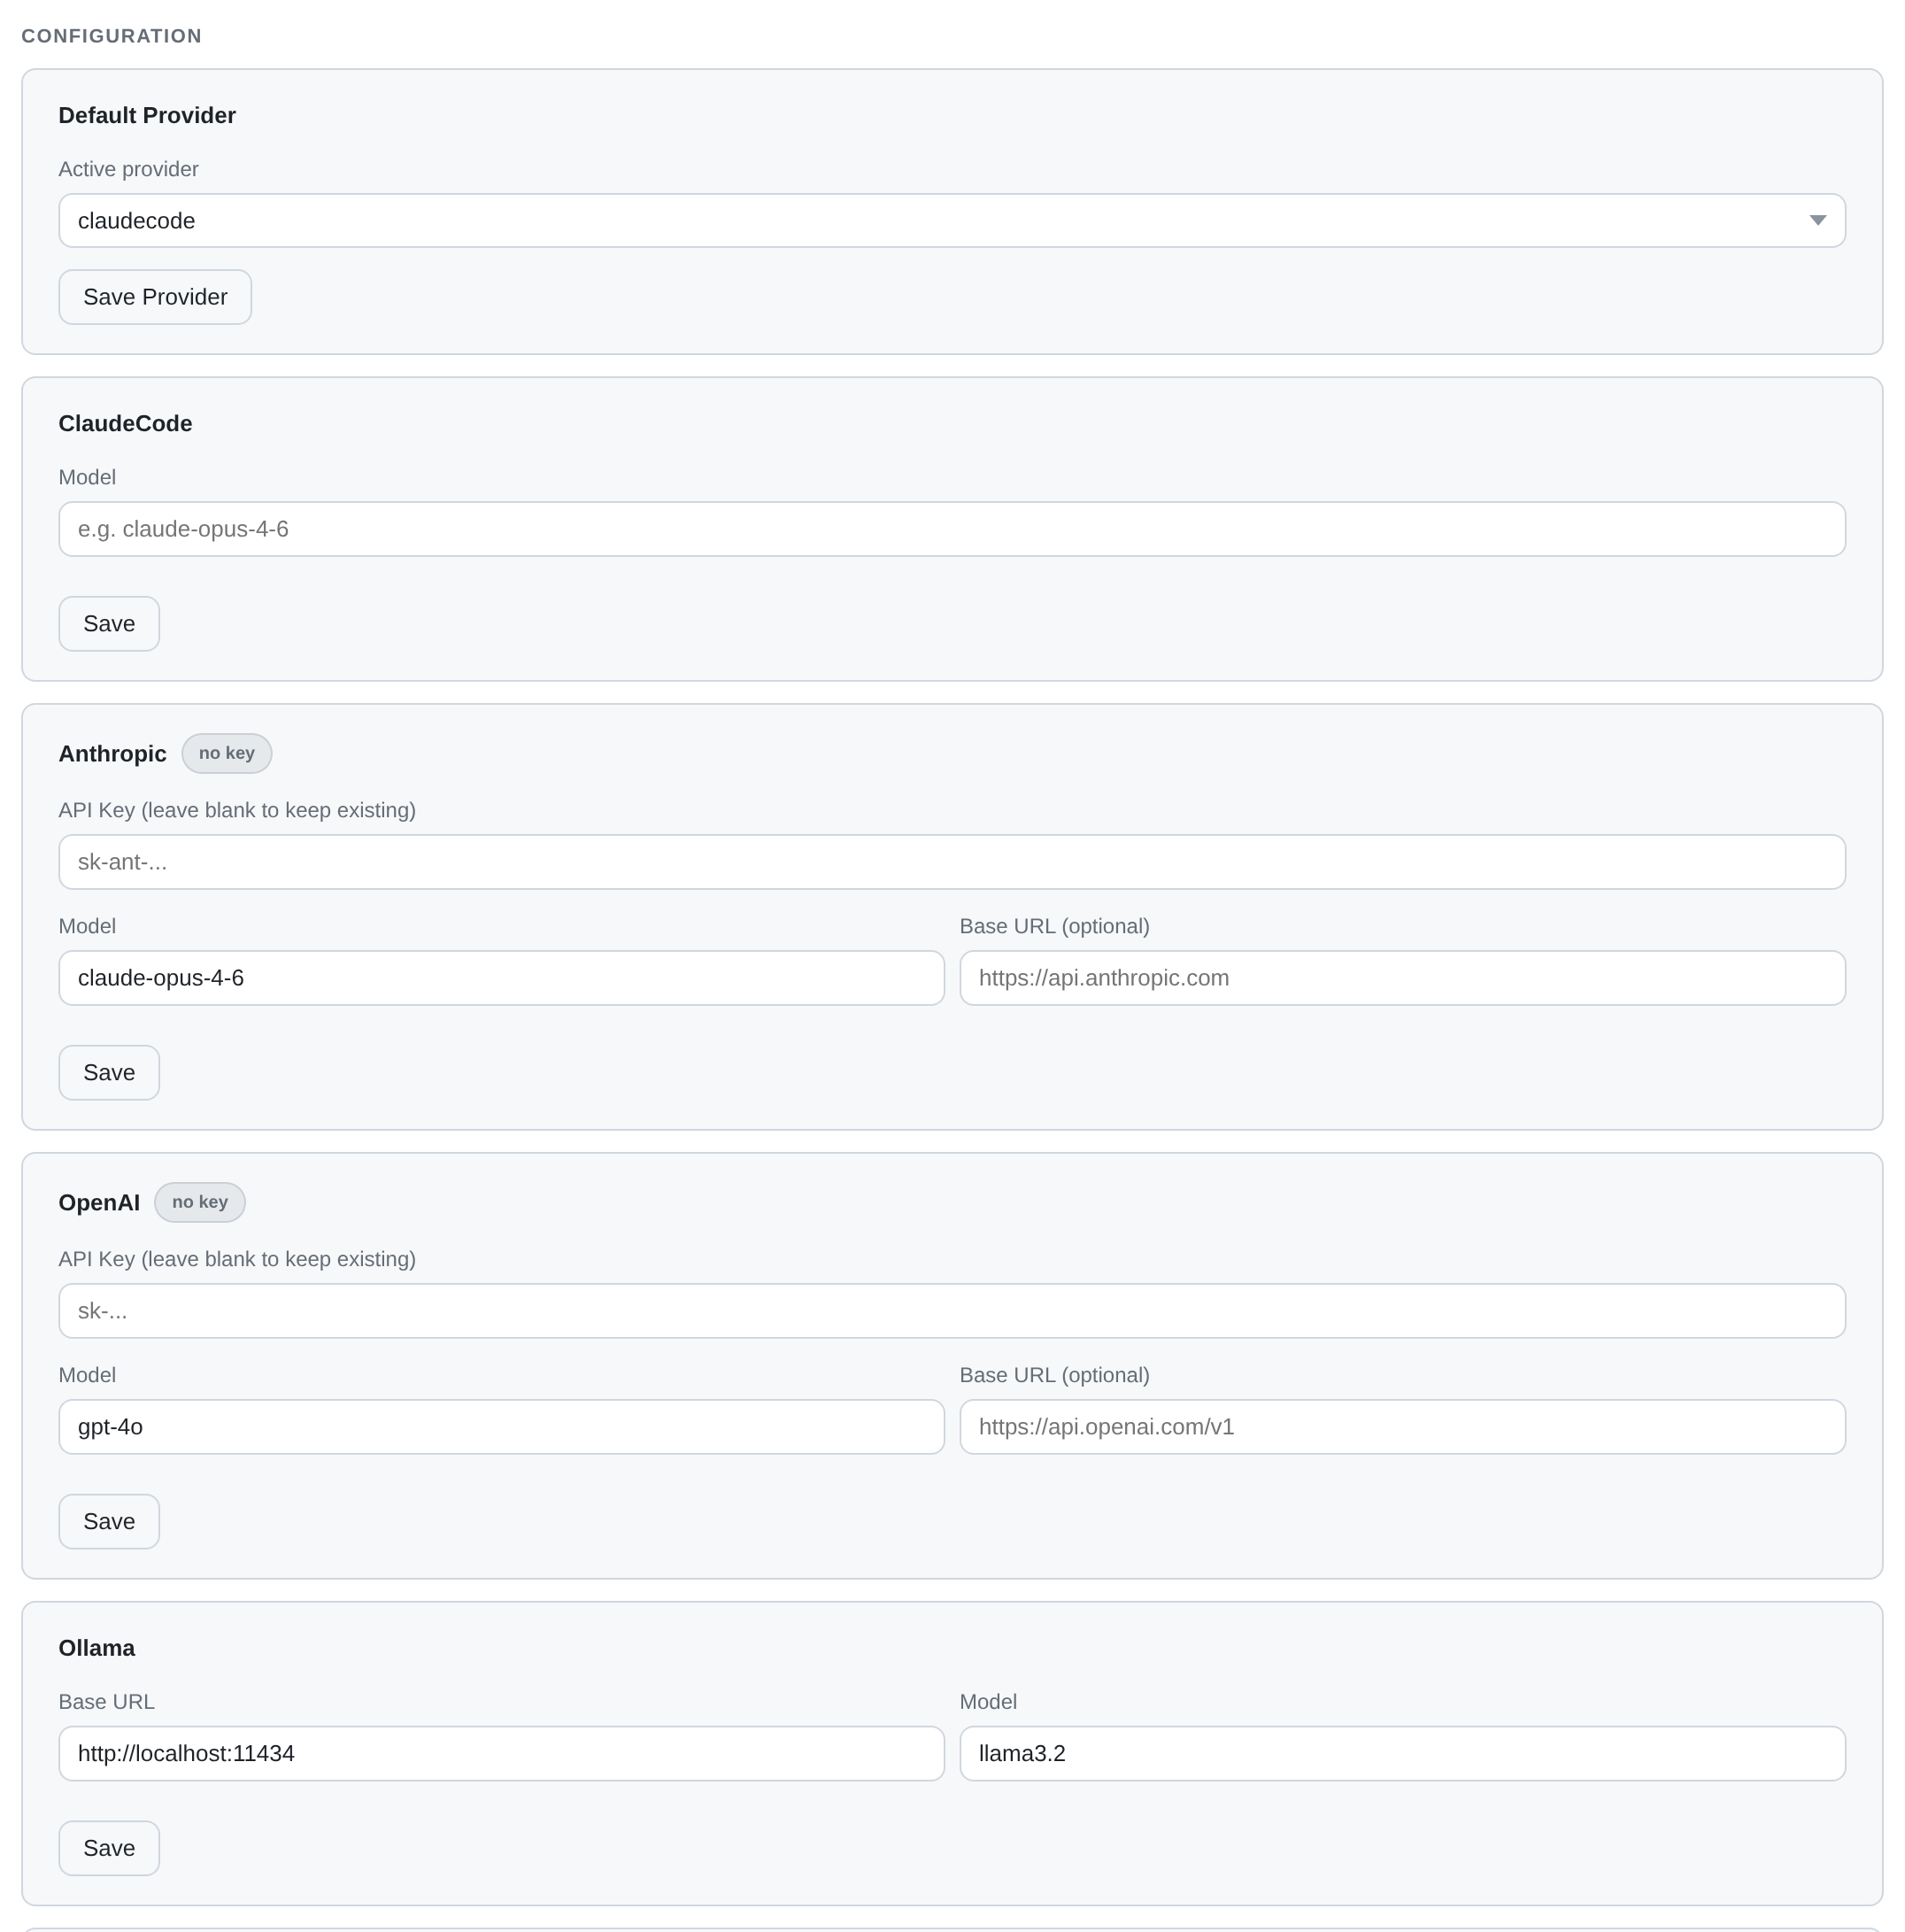
Settings is global, not per-project. The Configuration section edits the
same provider keys that cloop config set writes: the default provider, and for
each backend a model, a base URL and an API key. Each card saves on its own. API
keys are write-only: leave the field blank to keep the existing key. A no key
badge marks a backend that has none. For help picking a backend, see
Choosing and configuring a provider.
Further down the same tab are Display glasses (a personal, expiring link for Meta Ray-Ban Display glasses), Hidden Projects, and a Danger Zone, whose Reset Project State clears the step history but keeps the goal and configuration.
Hiding a project removes it from your dashboard only. It keeps running, and other users still see it. Hidden Projects shows only how many projects you have hidden. Their names appear in a dialog when you ask for them, so they don't show up on screen when you open this tab for something else.
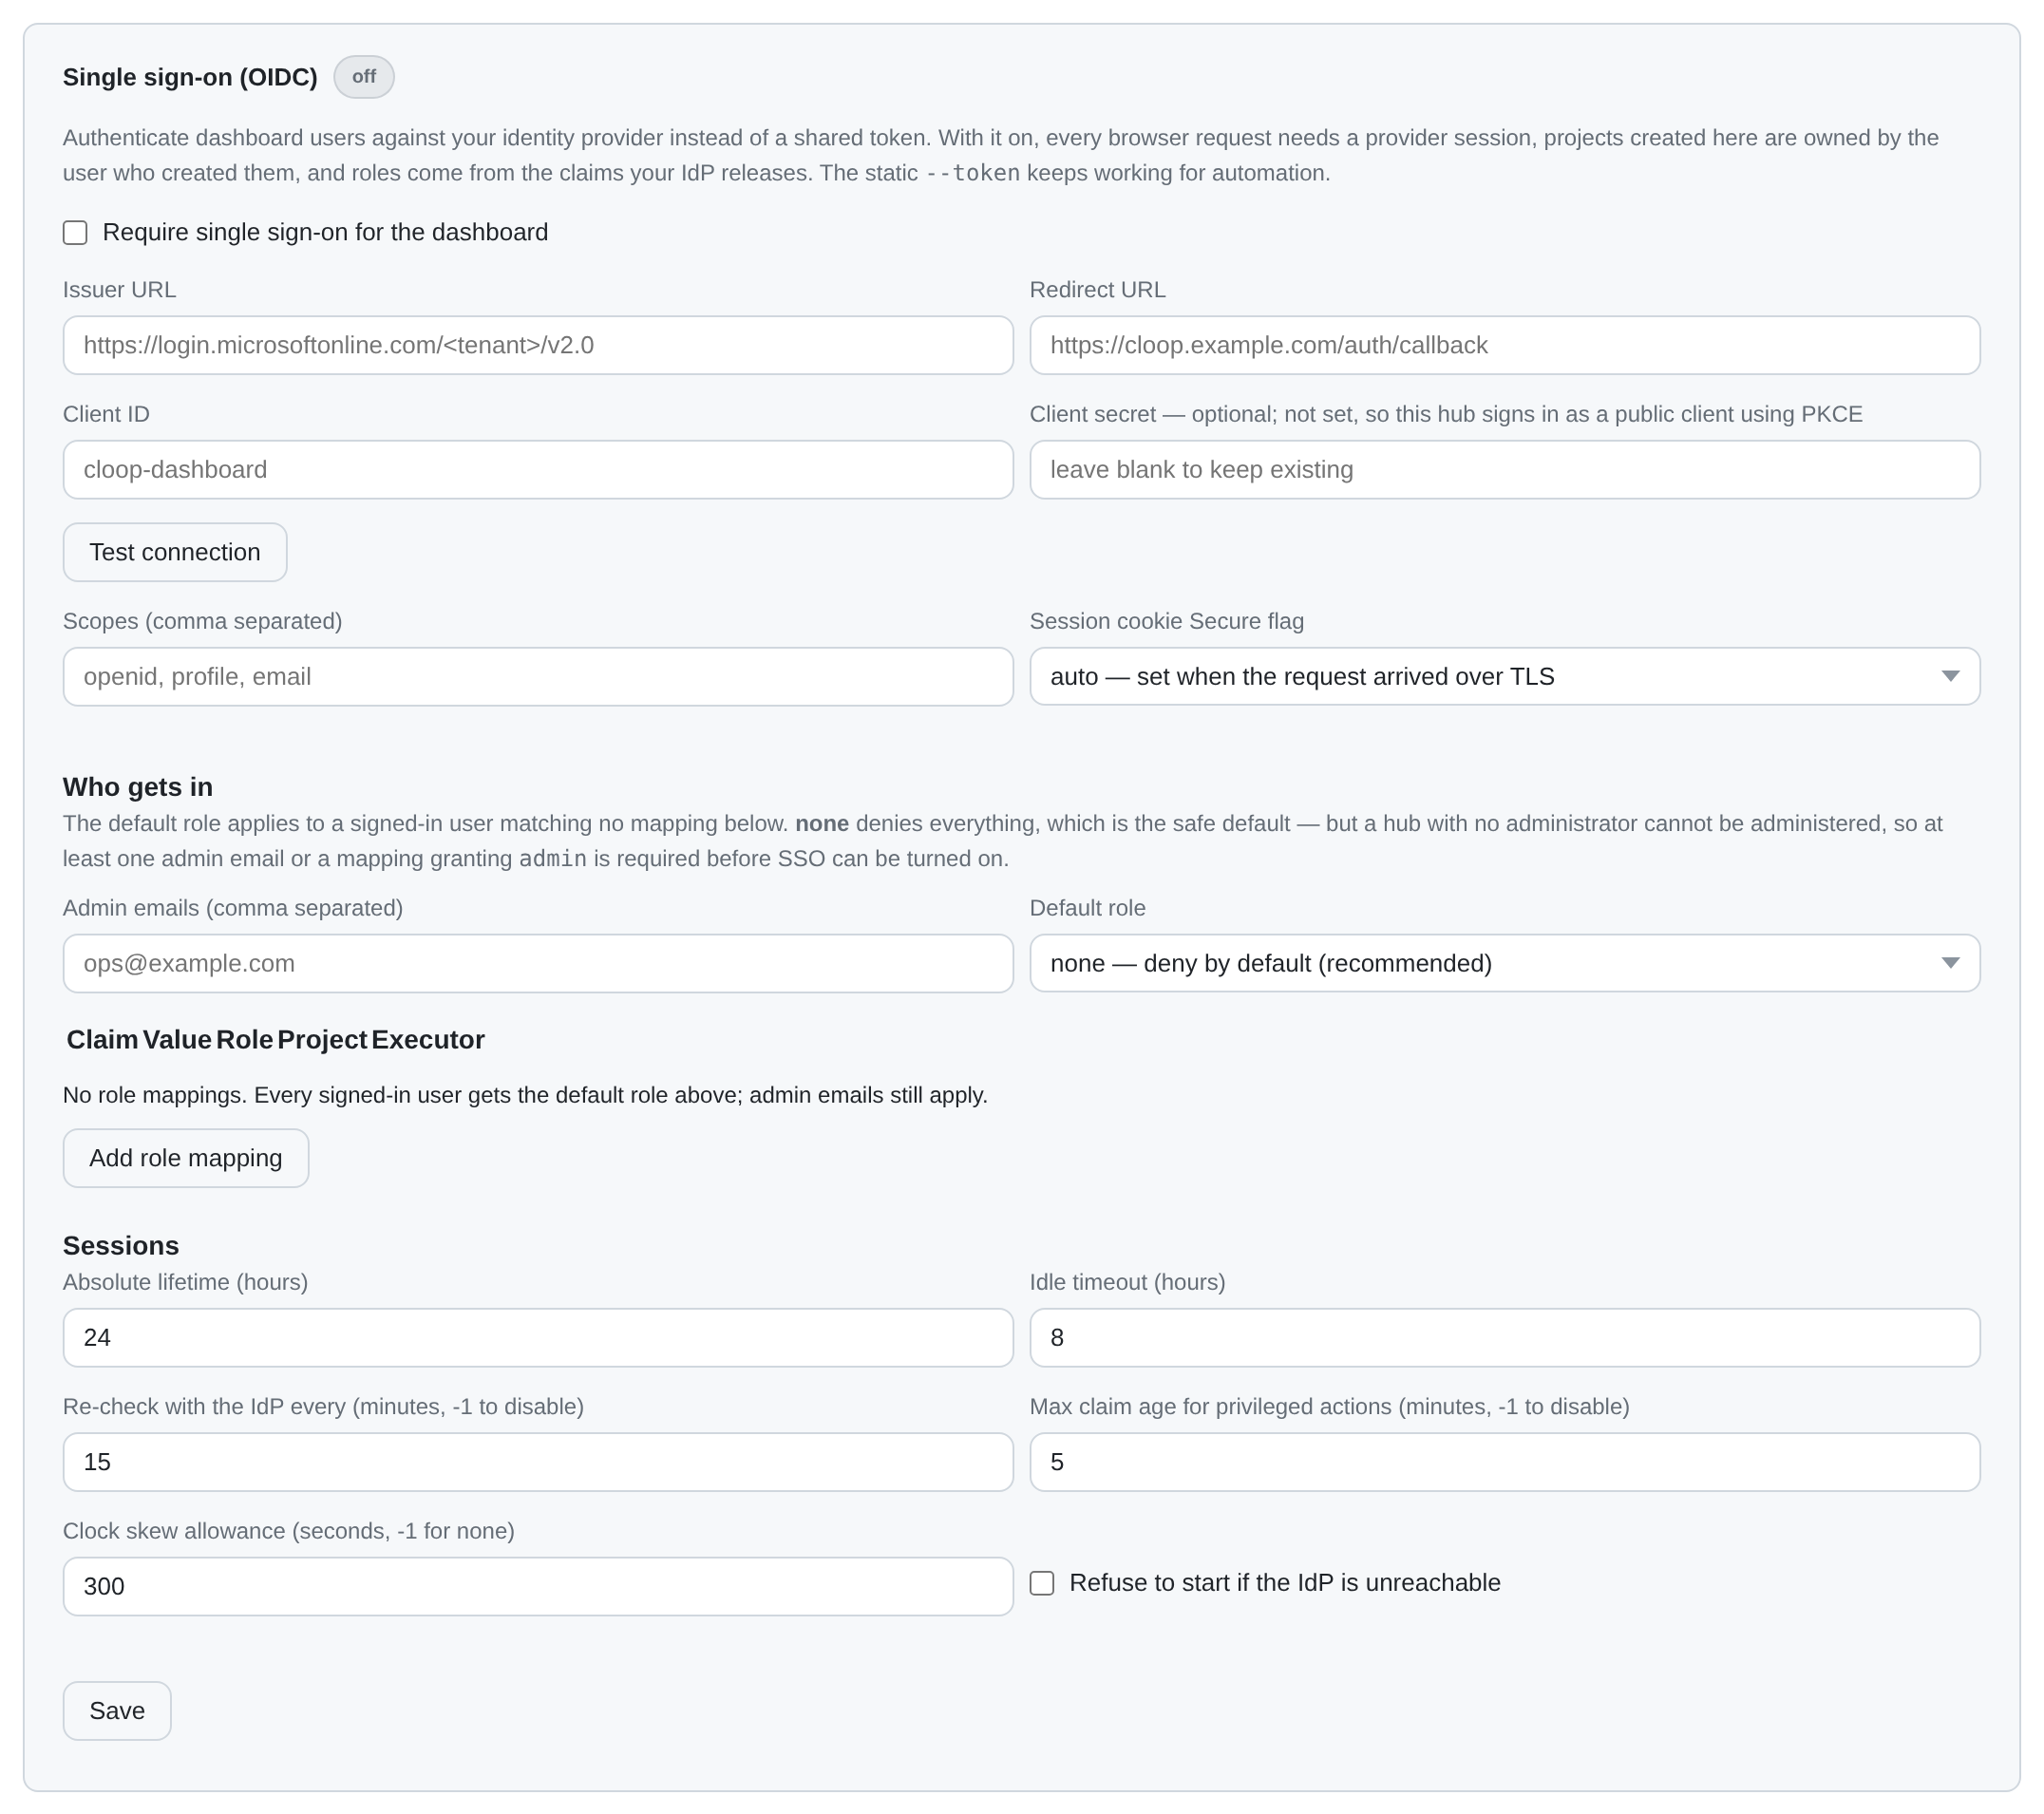
The last panel turns a single-user hub into a shared one. Single sign-on (OIDC) signs dashboard users in through your identity provider instead of with a shared token. With it on, every browser request needs a provider session, each project is owned by the user who created it, and roles come from the claims your IdP releases.
Two settings here matter most. The client secret is optional. If you leave it
blank, the hub signs in as a public client using PKCE, so there is no secret to
leak. The default role decides whether a role policy applies at all. none
denies everything that a mapping doesn't grant. If you leave it unset and add no
mapping, RBAC stays off, and everyone who can sign in through your provider gets
full access. The panel asks you to confirm before saving that, and keeps warning
you, next to an Enforce deny-by-default button, until a policy is in place.
SSO can only be turned on once there is at least one admin email or a claim
mapping that grants admin, because a hub without an administrator can't be
administered. The security model
has the full details.
Where to go next
- How cloop works: the loop behind the Tasks tab, including how a task is picked, how cloop knows it is finished, and what happens when it fails.
- The web dashboard: a reference for the same UI, with every tab, every run option and the glasses view.
- Executors: how a task gets from the orchestrator to a sandbox and back, and what enrolling a device sets up.
- Secrets and egress: what a grant is, when a lease expires, and how a sandbox gets a credential without being able to keep it.
- Enterprise hosts: per-project repositories, firewall rules, gVisor and Kata runtimes, and passing hardware into a sandbox.